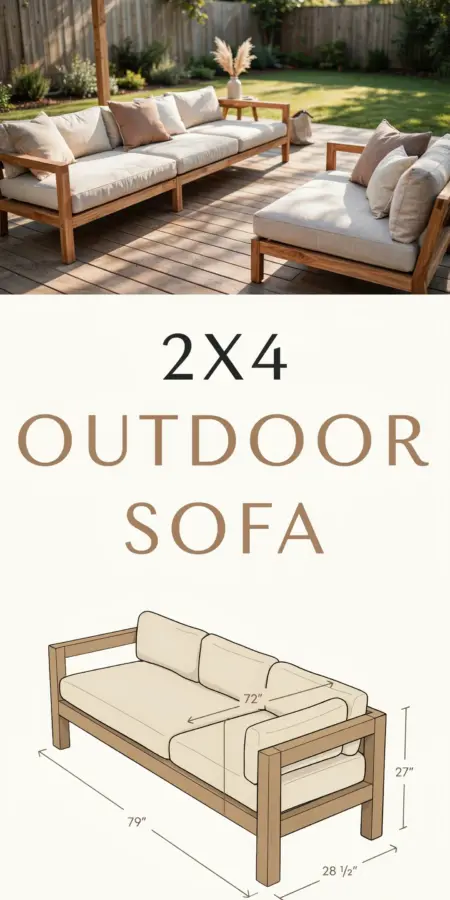
Why Build Your Own 2×4 Outdoor Sofa This Season?
If you have been scrolling through Pinterest lately, you have probably seen the 2×4 outdoor sofa plans from Ana White. These designs have been around for years, but this spring they are trending harder than ever. Why? Because lumber prices have finally leveled off, and more people are looking for weekend projects that actually get them outdoors. Building your own sofa from standard 2x4s is one of the most practical ways to furnish a patio or deck without spending thousands of dollars. And if you have never touched a saw before, this is the perfect place to start.
The best part about this particular plan is that it uses common framing lumber that costs around $4 to $6 per board. For the entire sofa, you will likely spend less than $60 on wood. Compare that to a store bought outdoor couch that easily runs $300 or more. Plus, you get to choose the finish and the exact dimensions for your space.
Tools and Materials You Need for This Beginner Project
Before you start cutting, gather a few basic tools. You do not need a full workshop. A circular saw or a miter saw, a drill driver, a tape measure, and a square will get the job done. If you do not own a circular saw, a handsaw works fine for the small number of cuts required. Ana White lists a kreg jig for pocket holes, but you can also use simple deck screws and a straight drill bit.
Here is what you will need for the standard 48 inch wide sofa:
- About 12 pieces of 2×4 lumber (8 feet long) – choose pressure treated wood for outdoor longevity or cedar for a nicer appearance.
- Deck screws (3 inch and 2.5 inch) – pick exterior grade ones to prevent rust.
- Wood glue – it adds strength to every joint.
- Sandpaper (80 grit and 120 grit) – rough wood splinters easily.
- Outdoor paint or stain – look for a UV blocking formula so your work stays bright.
- Optional: a pocket hole jig if you want hidden screws, but honestly, exposed screws look fine once painted.
One tip that saved me time: buy your lumber a few days ahead and let it acclimate to your garage or yard. Fresh pressure treated wood can be very wet, and it will shrink as it dries. If you build right away, joints might loosen up in a month.
Step by Step: Building the Frame from 2x4s
The construction process starts with the base frame. You will cut four pieces at 48 inches for the front and back rails, and four pieces at 21 inches for the side rails. The plans call for a simple rectangle that sits on short legs. I recommend cutting the legs at 16 inches tall if you want a standard seat height of about 18 inches. Keep in mind that your cushions will add another 4 to 5 inches.
Assemble the frame by screwing the side rails into the front and back rails. Use two screws per joint and a dab of glue. Make sure everything is square by measuring diagonally from corner to corner. If the numbers match, you are squared up. Clamp the frame together while you drill to avoid shifting. This step alone takes about 30 minutes, and it is nearly impossible to mess up.
Once the base is done, add the seat slats. You will cut five or six slats at 48 inches long. Space them about a half inch apart so water can drain through. Screw each slat into the front and back rails below. I like to pre drill holes to keep the wood from splitting, especially near the ends of the slats.
Cutting and Assembling the Seats and Backrest
The backrest is what makes this a sofa and not just a bench. For a comfortable lounging angle, cut the back support legs at about 20 inches from the ground up. The backrest slats run vertically. You will need about seven slats, each cut to 24 inches long. Attach them to the back legs and to a top rail that runs across the width.
Angles can be tricky for beginners, so here is a straightforward method: mark the back legs at two points, drill the screws straight into the back slats, and then let the slats determine the angle naturally. Do not worry about precise 10 degree cuts. As long as the sofa leans back slightly (anywhere from 100 to 110 degrees from the seat), it will feel comfortable.
I made my first sofa with the back completely vertical, and it was not comfortable at all. After fixing it, I learned that a slight recline makes a huge difference. If you use an adjustable speed square or even a protractor app on your phone, you can dial in a comfortable angle easily.
Finishing Touches: Stain, Paint, or Seal?
This step matters more than the building itself because untreated pine outdoors will turn gray and crack within one season. You have three main options. First, a solid outdoor paint (like Behr or Valspar) gives a clean, modern look and hides wood imperfections. Second, a semi transparent stain lets the grain show while protecting from UV damage. Third, a clear sealer works if you love the natural yellow tone of pine, but you will need to reapply every year.
My personal preference for a seasonal project is paint. It is forgiving, covers up any uneven sanding, and you can match it to existing patio furniture
#diy #diyfurniture #outdoorbuilds #woodworking #anawhite
Leave a Comment