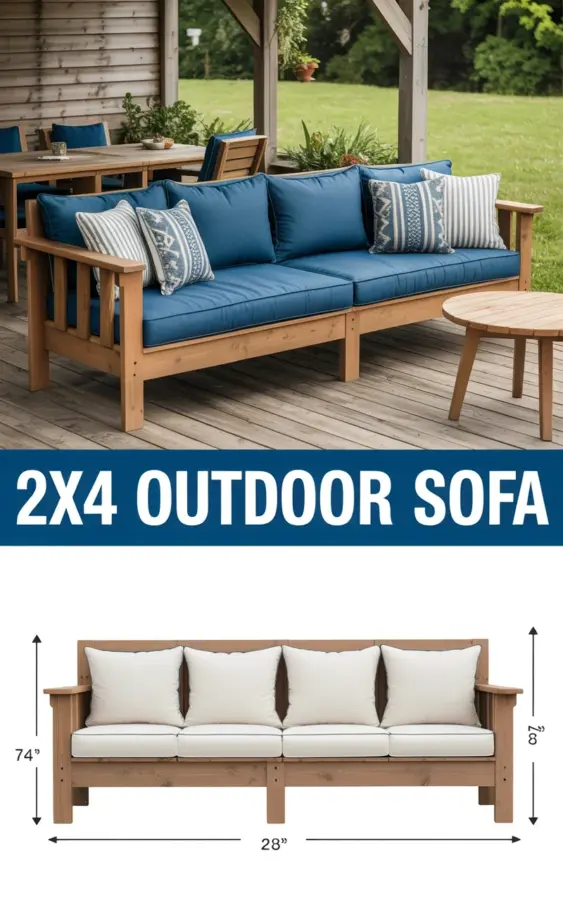
You have seen the photo: a spacious wooden daybed on a weathered deck, plush navy cushions, geometric throw pillows in blue and gray, all sheltered by a natural wood pergola. It is the kind of setting that makes you want to grab an iced tea and stay outside all weekend. That 2×4 outdoor sofa is a modern farmhouse dream, but building one yourself can come with surprises. After helping a few friends through their own builds, I noticed the same hiccups keep showing up. So let me walk you through the most common mistakes people make when building this DIY daybed, and exactly how to sidestep them. You will save time, frustration, and end up with a piece that looks like it was delivered from a catalog, not from a pile of lumber.
Choosing the Wrong Lumber for Your DIY Outdoor Furniture
The first mistake is treating this like an indoor project. Standard pine from the big-box store is soft, full of knots, and will warp or crack after one rainy season. For diy outdoor furniture, you need lumber that can handle sun and moisture without twisting into a pretzel.
- Use kiln-dried pressure-treated pine for the frame. It resists rot and accepts stain well.
- Skip cedar if you are on a budget. Cedar is beautiful but soft; the 2×4 legs will dent easily.
- Hand-select every board. Check for straight grain, minimal knots, and no cupping. Lay the board on a flat surface at the store and look for gaps.
- Let the wood acclimate outside in the shade for a few days before cutting. This prevents sudden movement after assembly.
One friend used untreated pine and painted it. Within a month, the seat supports were splitting at the screw holes. Spend the extra few dollars on treated lumber. Your daybed will thank you.
Skimping on Fasteners and Joinery (A Recipe for Wobble)
I have seen perfectly cut frames that wobble like a toddler’s first bike because the builder used drywall screws. Deck screws are stronger, but even they can snap if you pre-drill wrong. The modern farmhouse look depends on clean lines and sturdy construction, not on shaky armrests.
Use exterior-grade screws with a corrosion-resistant coating. Better yet, combine screws with pocket holes (Kreg jig style) for the seat and back supports. For the legs, consider a half-lap joint or use heavy-duty corner brackets hidden under the frame. Pre-drill every hole, especially near edges; splitting a 2×4 is frustrating and wastes wood.
Another tip: do not over-tighten. Screws that are driven too deep strip the wood fiber and weaken the hold. Drive them flush, not below. If you want extra rigidity, glue the joints with exterior wood glue before fastening. That daybed in the photo holds up to four people lounging, so your joinery has to be solid.
Forgetting to Account for Cushion Depth in the Seat Design
Here is a classic blunder: you build the frame to a certain dimension, then buy cushions that are thicker than you planned. Suddenly your seating depth is off, your back support sits too low, and the pillows look awkward. The navy cushions in the inspiration photo are deep, plush, and perfectly proportioned because the builder planned for them first.
Always decide on your cushion dimensions before cutting a single board. Measure the cushion height (typically 4 to 5 inches for outdoor foam) and the seat depth (usually 22 to 24 inches). Then subtract the cushion height from your back support height so the top of the backrest lands at a comfortable shoulder level. I recommend ordering cushions online from a retailer that lists exact dimensions, or make your own with marine-grade foam and Sunbrella fabric. Write those numbers down and keep them near your saw.
Ignoring Drainage and Airflow Under the Daybed
One of the biggest headaches with woodworking project furniture is moisture getting trapped underneath. If your daybed sits flat on a deck, water will pool under the cushions and rot the wood from the bottom up. The daybed in the photo sits on a wood deck with natural gaps, but you still need to elevate the frame slightly.
Add small rubber feet or plastic furniture pads under each leg. Even a half-inch lift allows air to circulate and water to run off. For the seat slats, leave about a quarter-inch gap between each 2×4. This lets rain pass through instead of soaking the cushions. If you want extra protection, coat the bottom edges of the frame with a water-resistant stain or sealant before you attach anything.
Treating the Pergola as an Afterthought
The pergola behind the sofa is not just decoration. It provides shade, defines the space, and keeps the cushions from fading too fast. But many builders rush this part and end up with a structure that looks flimsy or out of proportion. The photo shows a pergola with beams that match the thickness of the sofa’s legs, which ties the whole ana white inspired design together.
Plan your pergola dimensions at the same time as the sofa. The posts should be at least 4×4 for stability, and the cross beams should overhang by about a foot on each side. Use the same stain or paint color on the pergola as on the sofa frame. Also, consider how you will anchor the pergola to the deck. If you are building directly on wood decking, use heavy-duty brackets bolted through the joists. A wobbly pergola ruins the whole outdoor room feel.
Choosing Throw Pillows That Fight the Aesthetic
The geometric blue and gray pillows in the photo are not random. They add contrast, texture, and a pop of pattern against the solid navy cushions. A common mistake is to buy pillows that are too small or the wrong color, leaving the sofa looking like a mismatched couch.
Stick to outdoor fabric (polyester or acrylic) that can handle rain and sun. Use two or three pillows in coordinating patterns, such as a striped lumbar, a geometric square, and a solid gray. Place them at the corners of the daybed to create a cozy, layered look. Avoid overcrowding; three pillows on a 6-foot sofa is plenty. And please, always check the filler material. Polyester fill goes flat fast, so choose a foam or down-alternative insert that holds its shape.
Rushing the Stain or Paint Application
A rushed finish is the fastest way to make your 2×4 outdoor sofa look like a garage project. The natural wood color in the photo is warm and even, not blotchy or streaky. That takes two coats of semi-transparent stain applied with a brush, not a rag.
Sand every surface before finishing. Start with 80-grit, then 120-grit, and wipe off the dust with a tack cloth. Apply the first coat, let it dry fully (check the label for recoat time), then lightly sand again with 220-grit before the second coat. Use a stain with UV protection to keep the wood from turning gray. If you prefer paint, use an exterior-grade primer and two coats of outdoor latex. The key is patience: a beautiful finish takes three days, but it will last years longer than a one-coat rush job.
Building this daybed is totally doable, even for a beginner with a mitre saw and a drill. The difference between a piece that looks amateur and one that looks professional is simply avoiding these seven pitfalls. Pick your lumber carefully, measure for your cushions first, and do not skip the finishing steps. That photo of a sun-drenched daybed under a pergola can be your backyard reality this weekend.
If you are ready to start, grab a tape measure and a pencil. Sketch out your frame dimensions, order those navy cushions, and save this page as your go-to checklist. I would love to hear how your build turns out. Leave a comment or tag me in your finished pictures. Now go get that lumber.
#2x4outdoorsofa #diyoutdoorfurniture #modernfarmhouse #woodworkingproject #anawhite
Leave a Comment