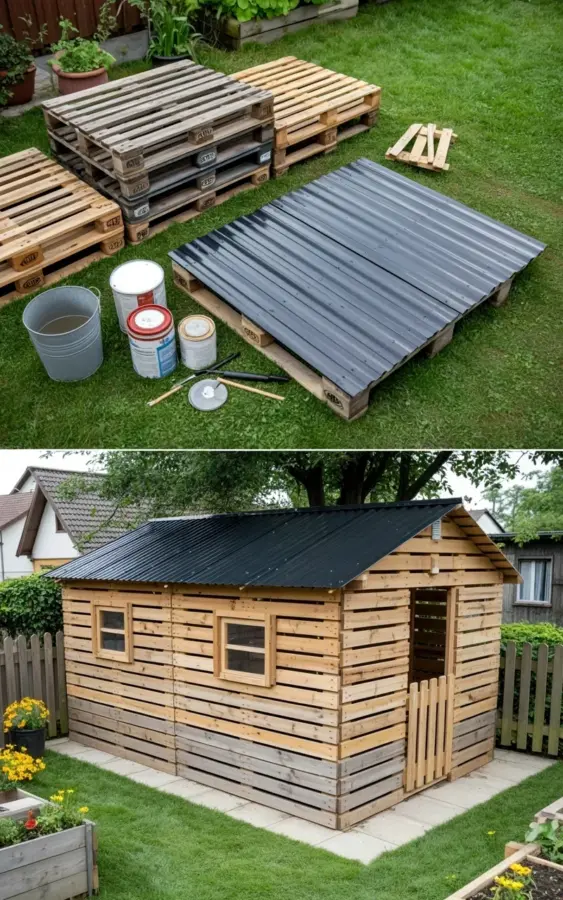
The before photo says it all: a pile of pallets, a black metal roof panel, white paint cans, a gray bucket, and my tools all sitting directly on the lawn
I almost made a rookie mistake that would have killed my palletshed before it even had a roof. Look, I was excited. I’d gathered twenty some recycled pallets, a salvaged black corrugated panel, and two small windows from a neighbor’s renovation dumpster. In the photo you see all that stuff laid out on the green grass like a flatpack kit waiting for assembly. And I almost started building right there. On damp grass. That’s a fast track to rot, warped wood, and a sad tilted floor. Not gonna lie, I was about ten minutes away from setting the first pallet down when my buddy walked over and said, “You’re not actually building on the lawn, are you?” That stopped me cold. So the before image is basically evidence of my near disaster. The after image shows the finished shed: natural wood pallet walls, a black metal roof, two little windows, and a wooden door. And underneath it all, a proper gravel base that I sweated over for a weekend. Here’s what I learned, so you don’t have to make the same blunder.
Why building on grass is a recipe for rot (and a wasted weekend)
Grass holds moisture like a sponge. Especially if you have clay soil underneath, which I do. Rain soaks into the lawn, the pallets absorb that dampness, and within a few months you’re looking at soft, spongy wood and black mold. Honestly, I’ve seen a pallet shed collapse sideways because the bottom boards rotted out. The owner had skipped the base entirely. Not me. After my buddy’s reality check, I pulled out all the materials and started researching. The answer was obvious: a gravel base. But I almost didn’t do it. Why? Because gravel costs money and digging is hard work. But here’s the thing: a dry base saves you from rebuilding the whole thing next year. End of story.
The gravel base and the prep work that saved my shed
I picked up a half-yard of crushed stone from a local landscape supply. Cost me about thirty bucks. I also got a roll of landscaping fabric to keep weeds from growing up through the gravel. Step one: remove the sod. I dug up the top four inches of grass and soil in a rectangle big enough for the shed plus a one-foot overhang. Step two: lay the fabric. Overlap the edges so no weed seeds sneak through. Step three: pour and level the gravel. I used a hand tamper to pack it down firm. It was hot. I sweated. But that base is now rock solid. Not a single weed pokes through. And the pallets sit on dry stone, not wet earth. That single decision probably added five years to the life of my shed. Here’s what you need for the job:
- A shovel (don’t be fancy, a flat spade works fine)
- Landscaping fabric (ten bucks at any hardware store)
- Crushed stone or gravel (I used 3/4 inch, about $30 for half a yard)
- Hand tamper or a flat piece of wood to tamp it down
- A level (really, just borrow one if you don’t own it)
The weird little aside: I spent an extra hour making the gravel base perfectly level because I’m mildly obsessive about that sort of thing. The top of my shed door still sticks a tiny bit in humid weather. So much for perfection.
Materials I used: recycled pallets, black metal roofing, and actual windows
The pallets were free from a local warehouse. I picked ones that were marked “HT” (heat treated) instead of ones treated with chemicals. That matters if you’re growing veggies near your shed. For the roof I used black corrugated metal panels. They were leftover from a neighbor’s barn project. Cost: zero dollars. I bought them off him for forty bucks. Sure, I could have used leftover asphalt shingles, but metal is lighter and requires less framing. The windows came from that dumpster rescue. Two rectangular casement windows, old aluminum frames, still with the glass intact. I built wooden surrounds for them and screwed them into the pallet walls. The door is just a pallet cut into shape, reinforced with a cross brace, and hung on heavy duty hinges from the hardware store. Total out-of-pocket cost for the whole project: around $120. That’s for gravel, hinges, screws, a few 2x4s for the roof frame, and some primer for the door. Not bad for a proper garden shed that looks decent.
Windows and door details that made a difference
I wanted natural light inside, so the two windows were non-negotiable. But I didn’t want them to leak. Sealant is cheap, water damage is expensive. I ran a bead of clear silicone around each window frame where it met the wood pallets. For the door, I used a simple wooden latch I made from a scrap 2×4 and a screw hook. Looks rustic, works fine. The white paint cans you see in the before photo? Those were leftovers from painting my kitchen cabinets. I slapped a coat of that white primer on the door just to seal it. It’s not fancy but it matches nothing and I don’t care. The shed has its own charm. If you want a prettier door, paint it whatever color you like. Just remember to seal all exposed edges of the pallets where rain might hit.
Three things I wish I knew before starting my pallet shed
1. Sorting pallets takes longer than you think. Not all pallets are the same width. Some are bowed, some have broken slats. I spent a whole afternoon just separating the good ones from the firewood pile. 2. Screws are better than nails every time. Nails will pull out when the wood expands and contracts with moisture. I used coated deck screws, 3 inches long. They hold tight. 3. Roof overhang matters more than you’d guess. I left about six inches of overhang on each side. That keeps rain from running straight down the walls. Without it, the bottom pallets would still get soaked even with a gravel base. Minor detail, major impact. Oh, and one more thing: don’t forget to treat the wood with a weatherproof finish if you want it to last more than a few years. I used a cheap linseed oil mix. Smells like a gym locker but it works.
Budget-friendly options for the rest of us
Not everyone has a neighbor with spare metal roofing. Not everyone finds windows in a dumpster. Here’s the good news: you can substitute almost everything without blowing your budget. Use corrugated fiberglass panels from the big box store for about fifteen bucks each instead of metal. Or shingles from a salvage yard. For windows, go to a re-store or a Habitat for Humanity ReStore. I’ve seen windows there for five bucks. Use pallets for siding only and build your frame with cheap 2x4s if you want it more square. The gravel base is non-negotiable though. That’s the one place you should not cheap out. Skip the fancy stains and expensive tools. A circular saw, a drill, a level, and some patience. That’s it. You can build this shed for under $150 if you hunt for deals.
Honest talk about the before and after photo
The top image shows my messy pile of supplies on the lawn. The bottom image shows the finished shed with its black roof, two little windows, and the wooden door. You can see the gravel base peeking out underneath. It’s not a palace. It’s a pallet shed that stores my garden tools and a few bags of potting soil. But it’s dry inside. It’s solid. And it only took me two weekends to build. The biggest lesson from that photo? The difference between carelessness and a tiny bit of planning. I nearly built on damp grass and would have regretted it for years. Instead, I spent three hours on a gravel base and now I have a shed that should last a decade or more.
If you’re planning your own diyshed from pallets, start with the ground. Not the walls. Not the roof. The ground. That’s the thing nobody tells you. Learn from my near miss. Put down some gravel. Then build your little palace. You’ll thank me in a year when your pallets are still solid and dry.
Got questions about your own palletproject? Drop a comment below or share a photo of your gravel base. I’d love to see it.
#palletshed #diyshed #palletproject #gardenshed #woodworkingdiy
Leave a Comment