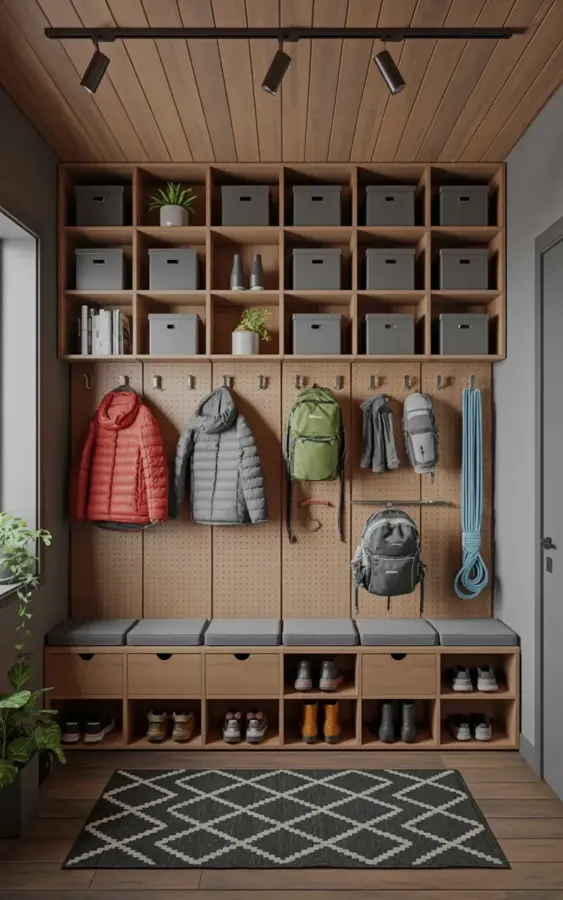
That first step into your house is chaotic, a pile of shoes, a tangle of bags, and the morning scramble to find gloves. We turned a bare wall in our mudroom into a serious workhorse with just a few basic materials, and it honestly cost less than a night out. The whole setup uses a giant pegboard for the stuff we grab daily and a simple cubby shelf with boxes for everything else. It’s the budgetentrywaystorage project that finally made our entryway feel like it had a plan.
This isn’t a custom-built unit from a carpenter or something you need a table saw to complete. It’s a weekend project with some common lumber, a standard sheet of pegboard, and a little patience. If you’re looking for mudroomideas that don’t involve ripping out walls or spending thousands, this one’s for you.
Measuring and Mapping the Perfect Entryway Wall
Before you buy anything, stand in your entryway and look at the actual wall space you have. We measured ours and planned the layout on paper first, because winging it with a pegboard rarely ends well. The visual idea is a large central shelving unit, but you can adapt the same principle to any wall with a clear middle section. You’re basically creating a frame for the pegboard, so you need to know the exact width and height of the area you want to fill.
Grab a tape measure and mark the studs in your wall. That’s the step most people skip, and it’s the one that leads to a pegboard ripping out of the drywall the first time you hang a winter coat on it. Use a stud finder, it takes two minutes, and it saves you from a repair job.
Once you’ve got the dimensions, sketch a simple plan. I am not an artist, my sketch looked like a child’s drawing of a box, but it helped me figure out how many cubbies I could fit and where the pegboard hooks should go. Think about the flow of the room, too, because you don’t want the shelf unit blocking a doorway or making the hall feel cramped.
Building the Cubby Shelf Unit for Storage Boxes
For the bottom and top sections, we used plywood to build a large cubby shelf frame. The upper section ended up with sixteen cubby holes, arranged in a grid of four across and four down. That might sound like a lot, but when you start sorting your stuff, you’ll see how fast those spaces fill up. We built the outer frame first, then cut internal dividers and screwed them into place, making sure the boxes would fit snugly inside each opening.
You can use pre-made cube organizers if you want to skip the cutting, but building the frame yourself is cheaper and lets you adjust the size. Make the cubbies the exact dimension of the boxes you plan to use. There’s nothing worse than a storage box that sticks out by an inch and catches your elbow every time you walk past.
We used gray and brown storage boxes inside the cubbies, which kept the visual chaos down. The neutral colors mean you can look at the wall and not feel overwhelmed by a rainbow of plastic. One cubby has a green plant in it, just to break up the line of boxes and add some life to the wall. It’s a small touch, but it makes the whole unit feel intentional rather than just utilitarian.
Installing the Pegboard Panel for Daily Gear
Here’s where the magic happens, the middle section is a large pegboard wall fitted between the top cubby shelf and the bottom bench. We painted the pegboard to match the trim, which makes it look like a built-in feature instead of something you bought at a hardware store. Attach it to the wall with some furring strips behind it so the hooks have room to click in. You absolutely need that gap between the pegboard and the drywall, otherwise the clips won’t have space to lock.
Use wood screws to secure the pegboard through the furring strips into the wall studs. Space the screws about every twelve inches, both along the edges and in the center. If you just screw the corners, the board will flex and bend when you pull a heavy bag off a hook.
Once it’s up, you’ll realize this is the most flexible storage solution you’ve ever owned. You can move hooks around with zero effort, try different arrangements, and adjust as your family’s needs change. Yesterday I had the hooks spaced for bags, today I moved them closer together to fit the climbing gear, and it took sixty seconds.
Organizing with Pegboard Hooks and Climbing Gear
So let’s talk about what actually goes on the pegboard, because this is where the design meets reality. In the photo, you can see a red puffy jacket and gray puffy jackets hanging right on the board. Those are the everyday coats, the ones that need to be grabbed without hunting through a closet. We also have green backpacks slung on hooks, keeping the school bags off the floor and out of the way.
The climbing gear is what really makes this wall special in our house. Long blue climbing rope loops neatly over a large hook. Carabiners and quickdraws hang on smaller pegs, and helmets sit on the top shelf cubbies. It turns an ugly pile of gear into a decorative element that actually looks kind of cool.
Here are a few things that work brilliantly on a pegboard in an entryway:
- Keys: a small cup attachment puts them in a designated spot, no more counter clutter.
- Dog leashes: you can buy hook clips that hold them flat against the board.
- Hats and beanies: slide them over the longer peg hooks.
- Umbrellas: use the large round hooks to trap the handle.
- Reusable grocery bags: stuff them into a small canvas bin that hangs on two pegs.
Don’t overload the board though. If it’s jam-packed with stuff, it stops being functional and starts being an eyesore. Leave some empty hooks. It’s okay to have a little negative space, it makes it easier to see what’s there.
Styling, Decor and Finishing Touches Under the Pegboard
We placed a long wooden bench underneath the pegboard to create a landing zone for shoes. It’s not fancy, just a sturdy piece of wood on legs, but it’s deep enough to sit on while you lace up your boots. Below that, we added a row of wire baskets for shoes. Those baskets were a game-changer, they stop the shoe pile from spreading across the whole floor.
I added a single small shelf next to the pegboard just for a catch-all jar. It has change, a few hair ties, and a lip balm that lives there permanently. That little shelf prevents small things from getting buried under the bigger items, and it gives the eye a break from the heavy-duty hooks.
Don’t forget the lighting. A harsh overhead light makes the wall look like a locker room, while a warm lamp or a small wall sconce softens the whole space. We hung a small picture light above the board, and it made the colors in the jackets and the green plant pop. It’s a detail that costs twenty dollars but makes the area look twenty times more intentional.
Everyday Maintenance and Keeping the System Tidy
Here’s the thing about entryway organization, it only works if you maintain it. A system like this requires a five-minute reset every couple of days. Put the backpacks back on their hooks, toss the shoes in the baskets, and pull the boxes that have been rummaged through back into alignment. That’s it. The pegboard makes the daily habit easy because there’s a spot for everything.
Storage boxes in the cubbies might get messy inside, but you can hide it. That’s the whole point of the boxes. We label ours with a simple label maker, it’s nerdy, but it means my husband stops dumping sunscreen in the kitchen drawer. If the boxes get dusty, just pull them out and wipe them down with a damp cloth, they’re lightweight and come out without any fuss.
Re-evaluate the hooks seasonally. In winter, the puffy jackets are out. In summer, we swap them for light jackets and put the heavy coats in storage. This keeps the board relevant and stops it from becoming a shrine to last winter’s scarf. It’s a five-minute change that keeps the whole entryway feeling fresh.
The Budget Breakdown: What This DIY Storage Actually Costs
Look, the best part of this project is that you don’t need to hire a carpenter. You can build this entire setup with a few sheets of plywood, a couple of 2x4s for framing, and one standard sheet of pegboard. The total cost for materials, even if you buy nice wood and premium hardware, is under two hundred dollars in most markets. Compare that to a custom built-in unit that costs over a thousand, and you see why this is such a great option.
If you already own a drill and a saw, your cost drops even more. The boxes are the only other real expense, but you can find sturdy fabric cubes at major retailers for around six dollars each. You don’t have to buy them all at once. We bought a few, then added more the next month when we had extra cash.
The pegboard hooks themselves are cheap, too. You can buy a mixed bag of hooks for under fifteen dollars, and that will cover most of what you need. The result is a space that looks high-end, but costs around the same as a new television. The best kind of DIY is the one where you get more value out of it than you put in, and this is that project.
Okay, so you have the blueprint now. Measure the wall, build the grid frame, install the pegboard, and sort your stuff into the boxes. It’s a straightforward Saturday project that will change how you walk into your house every single day. Go grab your tools and make that entryway work for you.
Leave a Comment