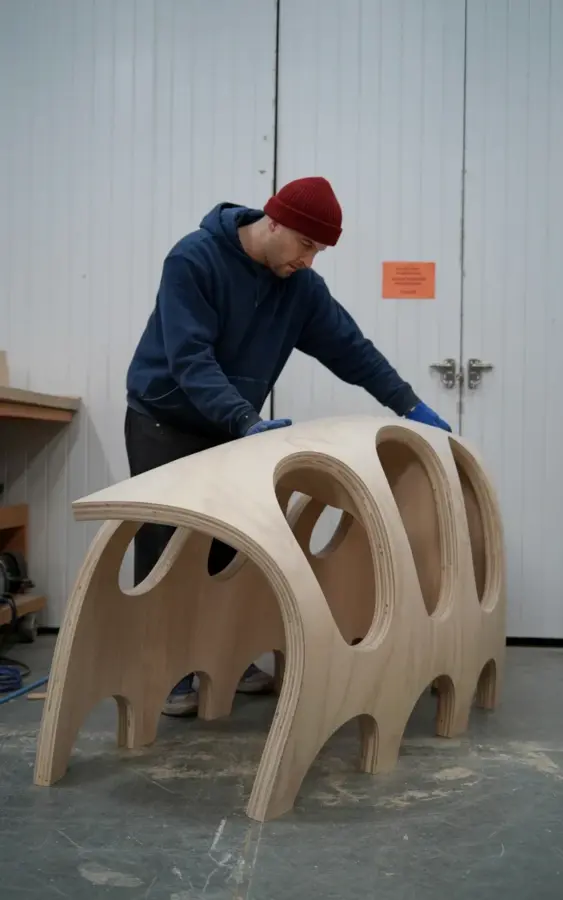
OK so you’ve got the plywood cut, the curves are flowing, and that sculptural rocking chair is finally starting to look like something. You’re standing there in your workshop, maybe in a navy hoodie and a red beanie to keep the dust out of your hair, gloves on, admiring the light-colored plywood form in front of you. The interlocking slots are cut, the segments are stacked, and you’re ready to slather on the glue. Stop right there. Building a plywood rocking chair from a design with organic curved segments is a patient man’s game, and the one mistake that will absolutely ruin your line is skipping the dry fit. I’ve done it once, on a piece just like this, and I spent the next two hours with a chisel and a lot of regret.
The photo of this build shows a man working on a large, abstract curved form, those smooth, hollowed-out sections looking almost like a piece of modern art. And that’s the trap. These sculptural furniture designs look so simple in their elegance that you assume they’ll just click together. They won’t. They need a rehearsal. Let me walk you through why a dry fit is non-negotiable if you want the grain and the curves to line up perfectly.
Why the Dry Fit is the Real Test Run for Curved Plywood
Think of a dry fit as your chance to see the whole puzzle before you commit to the permanence of glue. It’s a full assembly of every slot, every tab, and every curved segment without a drop of adhesive. This is when you find out that the tolerances on your CNC file or your template were slightly off, or that the plywood compressed in a spot you didn’t expect. Honestly, I’ve had moments where a piece that should have slid in with a gentle tap required a rubber mallet and some colorful language.
When you’re working with interlocking slots on a curved chair, you’re not just lining up a straight edge against a flat surface. You’re aligning three-dimensional geometry that has to meet at a specific angle to keep the line looking organic. If one slot is off by a millimeter, the whole curve shifts, and that smooth, poetic silhouette suddenly looks broken. The dry fit gives you the chance to fix that before it’s a crisis.
Marking Your Parts for a Flawless Furniture Design Assembly
Okay, here’s a genuinely weird thing that happens when you assemble a complex plywood form: you will forget which piece goes where. In theory, you think you know. In practice, you’ll have two similar-looking curved segments, and you’ll pick the wrong one, and it won’t fit, and you’ll panic. This is why the dry fit is also a labeling exercise.
Grab a pencil and put a simple mark on the inside face of each segment, just a letter or a number that tells you the order of assembly. Not only does this save you from the confusion of figuring out which tab goes into which slot, but it also helps you maintain the correct grain direction. On a light-colored plywood, the grain is your friend, it should flow like a river around the chair. If you flip a piece, the river breaks, and the whole woodworking project looks amateur.
Perfect Alignment Means Trusting Your Jig and Your Eyes
There’s a moment during assembly where you have everything loosely connected, and it’s all wobbling around, waiting for you to make it final. This is where the real design work happens. Look at the profile from every angle. Get down on your knees and sight down the line of the curve. Does it flow? Does that hollowed-out section line up with the one next to it? If you’re working from a plan, check your measurements against the actual physical object, because the plan is a lie until proven true.
I like to use a little trick for verifying alignment on curves. I take a long, straight piece of scrap wood and hold it tangent to the curve at the joint. It sounds counterintuitive, using a straight edge on a curved piece, but it shows you the angle of the joint clearly. If the angle is smooth and consistent, the straight edge will touch the plywood evenly on both sides of the seam. If it’s off, you’ll see a gap. It’s a quick, dirty, and extremely effective check.
The Silent Killer of Sculptural Furniture: Spring-Back and Stress
Here’s the thing about plywood: it has a memory. Even when you’ve cut it into lovely, sweeping curves, it wants to snap back to its original flat sheet state. When you dry fit the entire rocking chair, you’re putting tension into the structure. That tension is a problem for the glue-up phase.
If you skip the dry fit and go straight to glue, you might force a joint together that’s fighting you. The clamp seems tight, but the plywood is stressed, and the joint isn’t seated fully. Later, when the clamp comes off, the wood will slowly try to relax. Your perfect line will shift, and a hairline gap will appear at the seam. Doing a dry fit lets you feel where the stress is. It lets you figure out if you need extra clamps in a specific spot to hold a curve down while the glue sets. You need to know where the fight is before the clock starts ticking on your open time.
Don’t Skip the Spacer Method for Interlocking Slots
Alright, let’s talk about a specific technique for the dry fit that will save your sanity. When you have multiple interlocking slots, the pieces want to sit flush against each other. But if you do that, they’re a nightmare to pull apart. The solution is to use a thin spacer, like a playing card or a piece of craft paper, in each joint during the dry fit.
Slide the card in between the two plywood faces before you push them fully home. Then, when the dry fit is over and you’re happy, you just pull the cards out and the thing falls apart easily. It’s a ninety-second addition to your process that turns a frustrating wrestling match into a calm, controlled check. And on a sculptural chair design, calm control is exactly what you need.
The Reason Your Glue-Up Goes Wrong is the Part Numbering
Let me get a little philosophical about this. The dry fit isn’t just about checking the fit. It’s about mapping the exact sequence of your glue-up. You will have to apply glue, coat the slots, and connect the pieces all before the polyurethane glue starts to foam up or the PVA glue starts to skin over. There is no time to think.
During your dry fit, pay obsessive attention to the order of operations. Which pieces have to go in first? Which joints are hidden once the chair is assembled? Look, I know it feels like a chore to assemble and disassemble your project once, but you are literally rehearsing an hour of high-pressure work. When you finally do the real glue-up, you’ll be moving with muscle memory. You’ll know exactly which clamp goes where, and you’ll be done before the glue even thinks about setting. That is the difference between a frustrating afternoon and a triumphant one.
Learning to See the Line in the Chaos
Every curved plywood piece has a personality, a direction it wants to go. Sometimes you have to work against it to get the line you want. I was once building a chair similar to this, with soft, organic curves and a hollow center. I had the dry fit perfect, but during the glue-up, I rushed a single clamp. The stress in the plywood popped the joint loose, and the entire line shifted by a few millimeters. It was done. I had to cut the whole piece apart and recut a fresh sheet. That was a $40 mistake and a whole weekend lost.
The solution is to check your alignment while the glue is still wet, not after. Keep a damp rag nearby to wipe away the squeeze-out, but more importantly, keep your eyes on that line. Always. It takes two seconds to step back and look at the overall silhouette before you tighten every clamp down to maximum pressure. That two seconds can save you from a catastrophic redo.
The Trust Exercise of a Complete Dry Run
Try to make your dry fit as complete as possible. Attach every single segment, even the ones that are just decorative. Use all your clamps, even if you’re not tightening them fully. I find it helpful to do the full test run in the morning, and then leave it assembled for an hour while I clean the shop or sharpen a chisel. Look, this is just an excuse to have a coffee and stare at your work from across the room. But it works. It gives you a chance to see the piece in a new light.
Think of this stage as a rehearsal, not a test. It’s a chance to fix problems while mistakes are still cheap. You can file a tight slot, sand down a high spot, or adjust a clamp position now, all without the mess and panic of glue. And the best part? When you finally do the glue-up, you’ll feel an immense sense of calm because you’ve already done it once. That confidence shows in the final piece.
So, my best curved plywood tip is simple: treat the dry fit like a sacred ritual. It might feel like an annoying step that slows down the build, but it’s the only thing standing between you and a smooth, sculptural rocking chair that looks like a museum piece. What’s your best tip for working with curved plywood? I’d love to hear how you handle complex glue-ups. Share your thoughts in the comments.
Leave a Comment