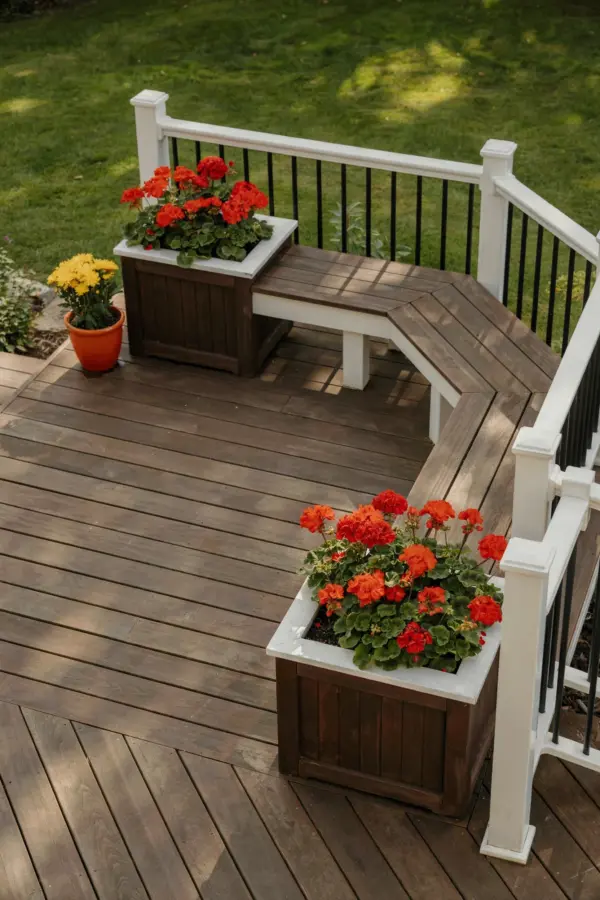
I think we can all agree that a bare deck looks a little unfinished, like a room with no furniture. That’s why I get so excited about a good deckbuilding transformation, especially one that solves the biggest problem most homeowners face: the empty void where seating should be. This particular project was a masterclass in avoiding the usual pitfalls, turning a flat, boring platform into a cozy, functional outdoor room. The secret weapons? A massive built-in bench, some clever planter boxes, and a rail that actually frames the view instead of blocking it.
Look, a deck without seating is just a very expensive wooden stage. You build it, you stand on it awkwardly with a drink in your hand, and you wonder why nobody wants to hang out there for more than ten minutes. The fix isn’t buying more lawn chairs that blow over in the wind; it’s building built-in bench seating that feels permanent and intentional. In this before and after, the addition of that seating and the surrounding deck planters and deck rail completely changed the energy of the space. It went from “what do I do with this?” to “when can I come over?”
Deck Building Mistakes to Avoid: The Seating Puzzle
The biggest mistake I see in deckbuilding is treating the platform as the finished product. You get the permits, you lay the joists, you screw down the decking, and you think you’re done. But then you realize you have nowhere to sit unless you drag plastic chairs out of the garage, and trust me, that kills the vibe instantly.
Here’s the thing: the seating needs to be part of the original plan, not an afterthought. When we looked at this deck, the first thing we noticed was the wasted space along the back edge. It was just empty decking, collecting leaves and getting scuffed by foot traffic. The fix here was to build a continuous bench that hugged the perimeter, creating a natural gathering spot.
So what should you do differently? Simple. Plan your furniture layout before you pour a single bit of concrete or sink a post. Know where the grill goes, where the loungers go, and most importantly, where the human beings are going to park themselves. If you skip this step, you are guaranteed to spend the next five summers saying “we should really build a bench.”
Built-In Bench Seating Ideas: The Corner Solution
Once you commit to built-ins, you need to think about shape. A straight line of bench gets monotonous, and it makes conversation awkward because everyone stares at the same wall. On this project, the smartest move was wrapping the bench around the corner. This creates an L-shaped configuration that turns the deck into a social hub.
The corner bench is the unsung hero here, ok? It gives you two distinct zones that still feel connected. You have the long run for stretching out with a book, and the shorter leg for sitting face-to-face with someone while you argue about what to cook on the grill. Here are the key features we included that you absolutely should steal for your own build:
- Angle the backrest slightly. A slight recline, maybe 10 degrees, makes the bench exponentially more comfortable than a flat 90-degree board.
- We built the bench base solid. Not just legs, but a skirted base with a hinged lid. You know what that means? Hidden storage for cushions and tools.
- Pocket holes are your friend. Use them for the frame to avoid ugly screws sticking out on the visible surfaces. Your thighs will thank you later.
Did we use the highest-end cedar for the bench top? Nope. We used a composite material for the top surface specifically because it doesn’t splinter and it handles the weather like a champ. The frame is treated pine, painted to match the rail. It saved money and bought us years of low-maintenance durability.
Deck Planter Boxes for Privacy and Green
Here’s a mistake I see constantly: people build the deck rail, but leave it looking like a prison fence. A rail without planters is just a barrier. This transformation nailed it by integrating deck planters directly into the structure, not just placing pots on the floor. We built planter boxes that sit on top of the bench back, giving you a ledge for greenery.
Honestly, the planters are doing double duty here. They look beautiful, sure, but they also act as a privacy screen. If your neighbor’s window is twenty feet away, a row of tall ornamental grasses in these planters gives you a living fence that is way more pleasant to look at than a vinyl panel. (Also, they hide the fact that your yard slopes away at a weird angle over there, which is a nice bonus).
The planter boxes themselves were built with a false bottom. Why? Because you don’t need 18 inches of soil for herbs and small flowers. You need about 8 inches of soil, and then the rest is a dark, airy space for drainage. That prevents the roots from rotting during heavy rain. So do yourself a favor and don’t skip the drainage layer. Drill holes in the side of the box at the false bottom level, not the bottom. That way, half an inch of water can sit in the tray without soaking the dirt.
Modern Deck Rail Ideas: Framing the View
The deck rail often gets treated as an obligation, something you build just to pass inspection. That is a missed opportunity. The rail is the frame around your outdoor picture. In this build, we used a horizontal cable rail system for the long view down the yard, paired with a solid top rail that matches the bench. It offers that crisp, modern aesthetic running lines that make the space feel bigger.
But here is a practical and important note: you should always run the rail in a way that doesn’t obstruct the sightline from the kitchen window. The old deck had bulky balusters that made it look like a cage when viewed from inside the house. Swapping those out for cables changed the whole experience. Now you can see the flower beds from the sink, and the kids in the yard aren’t broken up into tiny vertical slices. It sounds minor, but it has a massive impact on how open the property feels.
Also, the lighting is a key part of the rail design. We integrated LED strip lights underneath the top rail. This works for safety so people can see the edge at night, but it also creates a warm glow instead of using harsh floodlights that make the yard look like a parking lot at a Walmart. The glow highlights the texture of the wood decking, which is honestly the cheapest luxury upgrade you can do.
Before and After: The Transformation
The “before” deck was functional, but it was a waste of potential. It had no character, no heart, and no reason to linger. The “after” is a fully imagined space where you can host a dinner for eight or sit solo with your coffee.
We gained about 80 square feet of usable “floor space” by pushing the planter boxes inward. Wait, how does that work? Instead of having the planters on the ground outside the rail, they are mounted on the inside, at bench height. This means the actual deck surface isn’t crowded with big pots.
The color palette is also part of the success. The bench and rail are painted a soft, warm gray that recedes into the background, letting the green plants pop. The floor is a lighter, weathered wood tone. A dark brown or black deck would have made the small space feel like a cave, but this light scheme keeps it airy. You know what makes it feel super expensive? The contrast between the dark matte hardware and the light wood. It draws the eye instantly.
Deck Ideas to Steal for Your Own Yard
If you’re looking at this transformation and trying to figure out what to copy for your own house, focus on the integrated approach. Don’t buy a bench from a catalog; build one to fit your exact dimensions. That is the only way you can turn the wasted space at the edge into storage and seating.
This project took two weekends and about $900 in lumber and hardware. We messed up the first attempt at the bench armrests, if I’m being honest. They were angled too steeply, and coffee cups slid right off. We had to recut them at a 5 degree slant downward toward the back, so everything stays put. It’s a tiny detail, but it shows you that the first plan is rarely the perfect plan. Be ready to adapt.
Here are a few extra tips that saved us time and headaches:
- Pre-stain everything before assembly. You can’t reach the back of the planter boxes once they’re mounted, so stain the inside and the frame first. It looks way cleaner.
- Use hidden fasteners for the deck boards. They cost more, but you avoid those dark screw holes that catch water and look like freckles.
- Don’t put the grill near the bench. Keep the heat source away from the seating, or nobody will want to sit down.
You don’t need a massive yard or a huge budget to get this effect. You just need to look at your deck and stop seeing it as a collection of boards. See it as a blank canvas for a room. An outdoor room that invites you to sit, stay, and breathe. If you plan the layout, build in the storage and seating, and choose a rail that opens the space, you’ll finish the project wondering how you ever lived without it.
I used to hate walking out onto our bare deck at the end of the day. Now I find myself out there just staring at the way the cables catch the sunset. That’s the goal. Take the leap and start planning your own transformation, you won’t regret it. If you want a copy of the full build plans I used, just leave a comment below. Happy building!
#deckbuilding #builtinbench #deckplanters #deckrail #deckideas
Leave a Comment