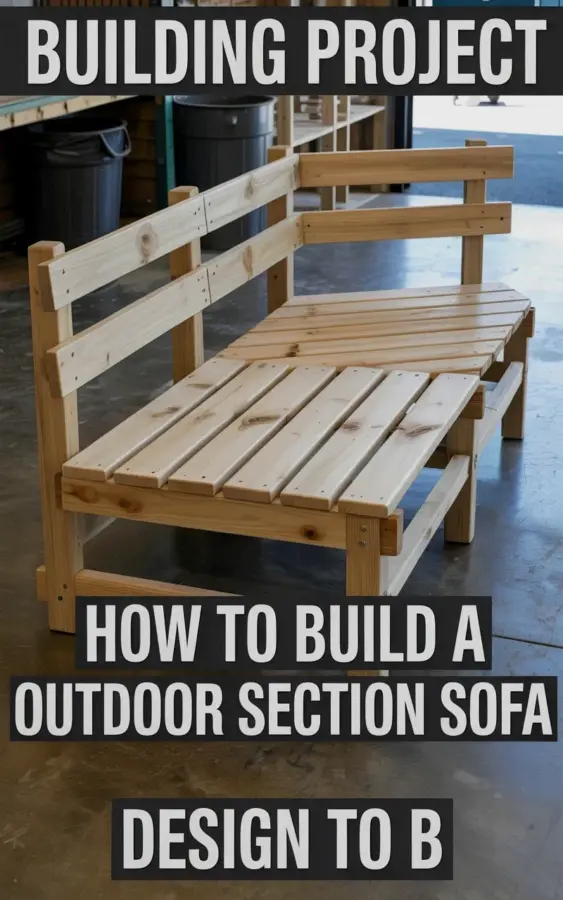
There’s a distinct smell of fresh pine sawdust in the shop, and about twenty linear feet of light wood slats are scattered across the polished concrete floor. I finally stopped planning and started cutting wood for my DIY outdoor sectional sofa frame, and honestly, I should have done this months ago. This outdoorSectional build has been sitting on my to-do list since last spring, but now the corner section and a straight back section are actually taking shape in front of me, not just living in my head.
If you are standing in your own garage right now, staring at a pile of lumber and wondering if this whole patio furniture thing is even worth the effort, this is your sign to just go for it. This light pine project is about as approachable as woodworking gets. I’m not a professional carpenter by any stretch of the imagination, I’m just a guy with a miter saw who got tired of paying ridiculous prices for flimsy outdoor furniture.
Why Pine Wood Patio Furniture Is the Right Call for Beginners
Before I picked up a single 2×4, I spent way too much time agonizing over what lumber to use. Cedar is beautiful but expensive, and teak is basically a luxury car payment. Pine is the budget king, plain and simple. A pressure-treated pine frame will last a few seasons if you care for it, and regular kiln-dried pine is perfect for a first build that you can easily modify or replace later.
Look, there is a reason so many diy woodworking projects start with pine. It cuts cleanly, it takes screws without splitting (if you pre-drill), and it’s light enough to move around the yard by yourself. Weigh the lumber down flat in your shop for a few days before cutting, let it acclimate. That advice alone will save you from the headache of warped boards and twisted legs later.
Gathering Your Tools and Getting the Shop Ready
The photo of my shop floor shows the build in its messy, real-world state. That is what it actually looks like when you are in the middle of the process, not a perfectly staged studio shot. You don’t need a full professional workshop for this. My setup is pretty basic, but it got the job done without any major disasters.
- The miter saw (absolutely essential for clean, square cuts).
- A simple cordless drill paired with a countersink bit, because nobody likes split pine boards.
- An orbital sander if you plan on keeping this for more than a year, otherwise, just sand aggressively by hand.
- Wood screws, outdoor rated if you want this thing to survive the humidity.
- A tape measure and a square, and I mean check your corners religiously.
And here’s the thing, I broke my favorite speed square halfway through this project because I stepped on it while reaching for a pencil. That was annoying. I had to use the edge of a book for the rest of the cuts, which is not a hack I recommend, but it worked. Keep your workspace clear. A clean floor is a safe floor, and finding all your drill bits before you need them is a small victory.
Cutting the Frame Pieces for Your DIY Outdoor Sofa Base
I started with the straight section because they are the easiest to build and give you early momentum. The vertical posts are the workhorses of the entire sofa frame, they take all the weight. I cut the legs for the backrest first, then moved to the shorter front legs that support the seat. Measure twice, cut once, and whine about the one piece you measured wrong, it happens to the best of us.
The math is actually pretty forgiving here. For a standard four-foot straight section, you are looking at four vertical posts for the back, four for the front, and a bunch of horizontal rails to connect them all. I recommend cutting the aprons, the horizontal supports that run between the legs, to identical lengths. Mark them clearly with a pencil. Labeling your piles helps more than you think, especially when the shop floor looks like a wood tornado hit it.
Assembling the Corner Section and Understanding the Geometry
Here is where the build gets a little spicy. The corner section is what makes this a true outdoor sectional sofa frame rather than just a bunch of disconnected benches. You need to create a ninety-degree angle that actually supports a person slouching into it. I laid out the pieces on the floor like a puzzle, following the exact layout shown in my progress photo, the corner sits proudly in the middle while the straight sections attach to its sides.
One thing I learned the hard way: pay attention to the thickness of your posts when calculating the overall footprint. If your corner piece uses thicker stock, your straight sections need to butt up against it correctly or you will have a weird overhang. I clamped everything together before driving any screws. Dry fitting is your best friend. Use clamps. Ruin a couple clamps. It is fine.
Attaching the Horizontal Slats for Seat and Backrest
Now for the part that makes it look like a furniture project and not a weird wooden cage. The slats, those horizontal pieces of light pine you see in the photo, provide the surface for your cushions and backrest. I used a scrap piece of wood as a spacer to keep the gaps even. This is crucial. If you eyeball the spacing on a fifteen-slat section, you will end up with a cosmic alignment of uneven rows that looks terrible.
Cut slats slightly longer than the actual frame width and trim them flush after installation. It is easier to cut three boards down to size than to measure each bay precisely. For the seat, run the slats perpendicular to the front and back rails. For the backrest, run them vertically, just like in my shop photo. Attach everything with exterior grade screws, and counter-sink them slightly so the sharp heads don’t tear your cushions apart.
And do not forget the center support. This is a mistake I almost made. A wide span without a middle rail will sag over time. Trust me on this, gravity is not on your side. A simple center stretcher running under the seat slats will keep that flat line for years.
Reinforcing the Joints and Building an Outdoor Sofa Frame That Lasts
Pine is soft, there is no way around it. So you have to make the joinery work harder. I used a pocket hole jig for the main frame joints because it creates a mechanical connection that resists racking. Racking is the wobbly motion you feel when you push on the armrest of cheap mass produced furniture. We are not building that. We are building something that can handle a couple of adults flopping down after a BBQ.
The critical point is diagonal bracing. Corner braces are not the prettiest things to look at, but they will prevent the entire sofa from leaning over time. I added L-brackets to the inside corners of the frame where the straight and corner sections meet. It is impossible to see once the cushions are on, so prioritize function over style here.
Take your time with the final tightening of screws. Sometimes you have to back a screw out and re-drive it with a larger washer if the wood compresses too much. Pine is quirky that way, one day it grips tight, the next it feels like it is holding onto the screw with a loose handshake.
Finishing Touches and How to Actually Make It Last
Since this is a patio piece, finish selection matters. A simple exterior penetrating oil will let the pine gray out naturally, which some people love. If you prefer to keep that warm wood glow you see in the picture, you will need a UV-resistant exterior paint or stain with a sealant. The worst thing you can do is leave bare pine exposed to standing water, it will rot from the bottom up like a forgotten garden stake.
I went with a semi-transparent weatherproofing stain. It took about two hours to apply and a few days to fully cure, but it keeps the wood feeling more like furniture and less like a lumber pile. Sand everything before staining, especially the cut ends. The end grains soak up stain like a sponge and look blotchy if you rush this step.
There is a certain satisfaction that comes with walking past that polished concrete floor photo on your phone and realizing the stack of lumber now looks like a sofa. I am honestly a little stoked about how straight the lines turned out. No exaggerated claim here, it just looks clean.
Project Wrap-Up and a Gentle Push for You to Build
Building this outdoor sectional sofa frame was a two-weekend job from raw lumber to stain, and the cost was a fraction of what a comparable store-bought set would run. The straight section and corner are solid as a rock on the shop floor, and I am already mentally planning the matching ottoman. This is the kind of project that makes you look at your backyard and see potential instead of expenses.
If you have a saw and a weekend, you really have everything you need to make this pine wood patio furniture happen. Use this guide, watch a few videos, and buy more lumber than you think you need. Future you, sipping coffee on a sturdy sofa you built yourself, will be grateful you started. Save this for later, and go make some sawdust.
Leave a Comment