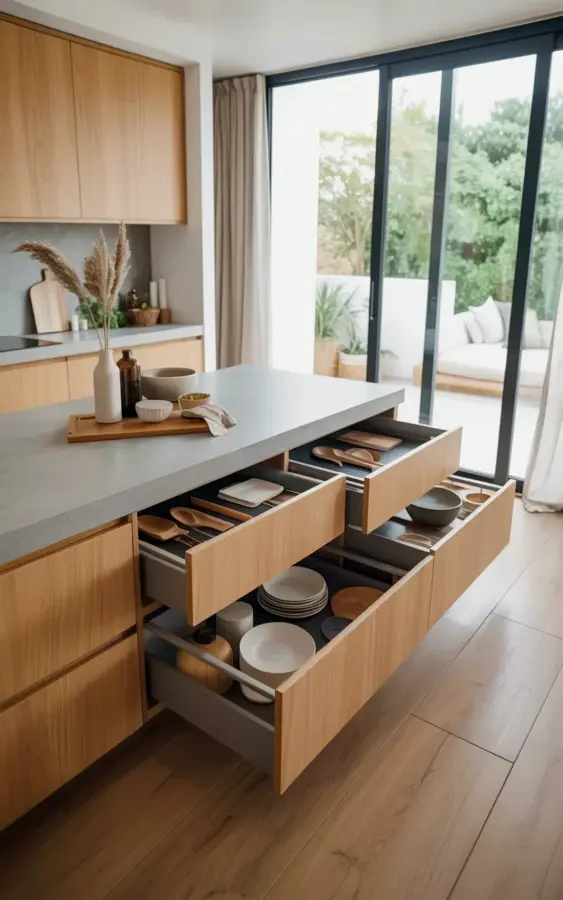
Spring is creeping in and my brain keeps circling back to one thing: the kitchen. Not in a vague, seasonal-cleaning way, either. This is about kitchen drawer organization, which sounds dull until you realize it’s the difference between a morning that flows and a morning where you’re digging for a spatula while your coffee gets cold. I’ve been staring at photos of a certain DIY island for weeks now, and honestly, the whole thing makes me want to rebuild everything I own.
The island in question sits in a light oak kitchen. It has a gray concrete countertop, and below that surface, the drawers are pulled all the way out. Not half-open, not jutting awkwardly into the walkway. Fully extended and showing off their insides. White ceramic plates stand upright in wooden slots. Wooden spoons rest in a neat section. Bowls stack without wobbling. There’s a kind of quiet triumph in it. Nothing is buried. Nothing is lost.
I think the real lesson here is that most of us design cabinets before we think about what goes inside them. We measure for the sink, for the stove, for the window placement. But the drawers? Those get filled with whatever falls out of the delivery box. That’s backwards. The best kitchen drawers start with a list of your actual stuff, then work backward from there.
This isn’t a once-a-year project either. It’s a trend, a seasonal reset, a way to enter the brighter half of the year without feeling like you’re drowning in clutter. If your kitchen currently has a drawer of chaos, the kind where you have to use two hands to open it and one hand to hold back the avalanche, this article is for you.
Plan Kitchen Drawers Around Your Real Daily Dishes
The first step is annoying because it requires thinking. I know. But stay with me. You need to figure out what you actually use, not what you think you should own. That beautiful ceramic platter you inherited? It stays in the buffet. The four wine glasses that don’t match anything? They’re just taking up air.
I love this specific island because the planner clearly wrote down their top ten items first. Plates, bowls, wooden spoons, maybe a few larger prep tools. That’s it. They didn’t try to cram a stand mixer into a drawer. They didn’t force in a knife block that doesn’t fit. They chose a small, honest set of things. When you plan around your daily dishes, the drawer becomes a function, not a storage bin for guilt objects.
This is also where you decide what you hate about your current setup. Maybe your bowls are stacked too high and you always catch your knuckles on the cabinet molding. Maybe your plates are stored so deep that you have to crawl halfway inside to reach the dinner set. Write that down. Your frustration is a blueprint.
Here’s a trick I picked up from a kitchen designer years ago. Take out every single item you use in a week. Put it on the counter. Now, measure the height of your plate stack, the width of your spoon collection, the diameter of your largest bowl. Those numbers are your new drawer dimensions. The photo of this island feels so peaceful because the compartments match the inventory exactly. It’s not decorative. It’s arithmetic.
Why Wide Open Drawers Beat Deep Cabinets for Kitchen Storage
Look, I get it. Deep lower cabinets are where people store their slow cookers and their wedding china. But they’re also the place where things go to disappear. You can’t see to the back. You can’t reach the bottom without kneeling and praying. Open drawers, especially on an island, solve that by showing you everything at once.
In the photo, the drawers are shallow but wide. That’s intentional. When you pull one out, you see the entire collection of plates, cutlery, and prep tools. You don’t have to shift piles around. You don’t have to mutter “where is it, where is it” while your family watches you fail. For a minimalist kitchen, this is the whole game. Fewer items, always visible, always within reach.
Here’s the thing about drawer depth, though. Deeper is not better. A twelve-inch-deep drawer just means you’ll stack things higher and lose the items at the bottom. A six-inch-deep drawer forces you to make choices. It also makes you face your overstock. If you can’t close the drawer, you have too many spatulas. There’s no polite way to say it.
Islands are perfect for this kind of open storage because you’re usually standing at them from both sides. Wide drawers mean you can access the contents from the left and the right. No one has to reach around you while you’re cooking. It’s a small shift, but it changes how your kitchen flows. Honestly, once you go open-drawer on an island, standard cabinets feel like a dark cave.
Build Simple Drawer Dividers as a DIY Kitchen Storage Upgrade
You don’t need custom inserts or a hundred-dollar organizer system to get this look. The island in the photo likely uses simple wood dividers. Low walls, basically. They’re easy to cut with a basic handsaw or miter saw. They glue right into the drawer base. And you can adjust them after a week of use if you realize your plates are thicker than you thought.
Start with a template made of cardboard. I’m not kidding. Grab a cereal box, cut it into strips, and arrange them in your empty drawer. Live with that for two days. Move things around. See what feels natural. Once you’re happy, transfer those measurements to your real wood. It’s extra work, but it saves you from the heartbreak of building a stylish divider that’s exactly one bowl too narrow.
For the wood itself, cedar is nice. It smells good and it’s soft to work with. But a half-inch piece of plywood, or even pine, does the job perfectly fine. You don’t need to spend money on exotic hardwood for the inside of a drawer. Nobody will see it. Save your budget for the drawer facing.
One tip I swear by, use a little bit of cork or rubber drawer liner under the dividers. It keeps the wood from sliding when you open and close the drawer hundreds of times. It also gives the plates and bowls some grip so they don’t go skidding into each other. The drawers in the photo have that quiet, stable look because of invisible liners. They’re doing heavy lifting without getting any credit.
How to Arrange the Inside of a Minimalist Kitchen Island
This is where the photo really shines. On the left side of the countertop, there’s a wooden serving board with dried pampas grass in a white vase. Next to it, dark glass bottles and white ceramic bowls. That stuff adds warmth. But the real star is the drawer below, and the layout there is pure logic.
Here’s a simple configuration that works. Put plates on one side, standing upright. Put bowls on the other side, stacked no more than three high. Put wooden spoons and prep tools in the middle, in a section that’s just wide enough to hold them loose. This isn’t fancy. It’s just organized by use case. Plates for serving, bowls for mixing and eating, tools for cooking.
For the utensils, don’t over-compartmentalize. If you give every single spoon its own slot, you’ll go insane. A long, wide space for the general utensils is fine. You can jam a few in there at an angle. It’s okay. The goal is to find things quickly, not to stage a museum exhibit.
Pile-ups are the enemy here. If you stack eight plates leaning sideways, the bottom one will crack eventually. If you cram a bowl under a cutting board, the bowl becomes invisible. The whole reason this island looks so effortless is that there’s no stacking of different categories. Each item type has its own designated zone. No overlaps, no chaos.
- Drawers with dividers are faster to clean because you remove one section at a time.
- Wide drawers hold a surprisingly small number of items, which is honestly the point.
- Wooden dividers feel less sterile than metal or plastic organizers, especially in a light oak kitchen.
Maintain a Minimalist Kitchen Without Losing Your Sanity
Ok so the drawer is built. The dividers are in. Everything has a home. Now comes the real challenge, keeping it that way. This is where the minimalist kitchen trend either sticks or dies. In my experience, the easiest maintenance trick is to have one small holding spot for “maybe” items. A basket or a single drawer where things live for a week before you decide if they actually belong in your kitchen.
Every Sunday, or maybe every time you do a deep clean, walk around with the holding basket. Find the stray thing that doesn’t belong backwards. Put it in the basket. Then on Friday, look at the basket and decide. This prevents you from exhausting yourself trying to be perfect every single day. It also stops the drawer from becoming a junk drawer again.
Also, pay attention to how you feel when you use the drawer after a month. If you’re still pulling out a wooden spoon and thinking “there it is” with a little flutter of relief, then the system worked. If you’re grumbling, adjust. There’s no award for sticking with a layout that doesn’t serve you. Move the dividers. Switch the plates and bowls. Tweak it.
I will say this: a minimalist kitchen doesn’t mean empty surfaces or zero personality. The pampas grass and the dark glass bottles in the photo, they’re not functional. They’re decorative. But they make the space feel alive. Minimalism is about removing the friction, not removing all the warmth. Keep a few things that make you happy, like a weird vase or a bowl you love. Just keep the drawers honest.
Seasonal Kitchen Refreshes for a Long-Lasting DIY Island
Because this project feels so tied to spring, I’ll mention that the seasons will change your drawer needs. In summer, you might use the grill tools more, but you won’t touch the soup ladle. In winter, the heavy stoneware plates come out and the light ceramic ones go away. That’s okay. Use your simple dividers with the flexibility to shift sections.
One of the best features of these DIY wood dividers is that they’re easy to unglue or reposition. You can cut new ones in an afternoon. You can slide the existing ones around if you used a friction fit instead of glue. When the season changes, your drawer changes with it. That’s something you can do with a classic cabinet, but it’s rarer. It takes ten minutes to fix, not a full renovation.
Also, if you have the stump space, consider swapping the countertop decor seasonally. Spring gets the pampas grass and light glass. Fall gets a wooden cutting board and maybe a small bowl of apples. These tiny details keep the kitchen from feeling frozen in time. A DIY island isn’t a one-and-done project. It’s the frame for your everyday life, and that life shifts.
At this point, I should probably mention that you don’t need a full woodshop to do this. A circular saw, a drill, a straight edge, some glue, and maybe a sander is enough. If you’ve never built a drawer insert before, start with one drawer. Just one. See how it feels. You’ll probably get hooked and want to do the whole island.
The broader idea here is that kitchen drawer organization isn’t actually about containers or labels or matching baskets. It’s about respecting your own habits. When you build your own cabinets, you’re the one who gets to decide what goes where. You don’t have to adapt to some factory’s idea of storage. You’re the designer now.
So, when you look at that photo of a light oak island with the gray concrete top and the perfectly arranged drawers, don’t feel envy. Feel direction. Get a tape measure, open your biggest drawer, and start asking better questions. What’s making this hard? What would easy look like? You already know the answer, you just haven’t built it yet. Do yourself a favor, measure your plate stack first. Then get to work. You’ll be glad you did.
Leave a Comment