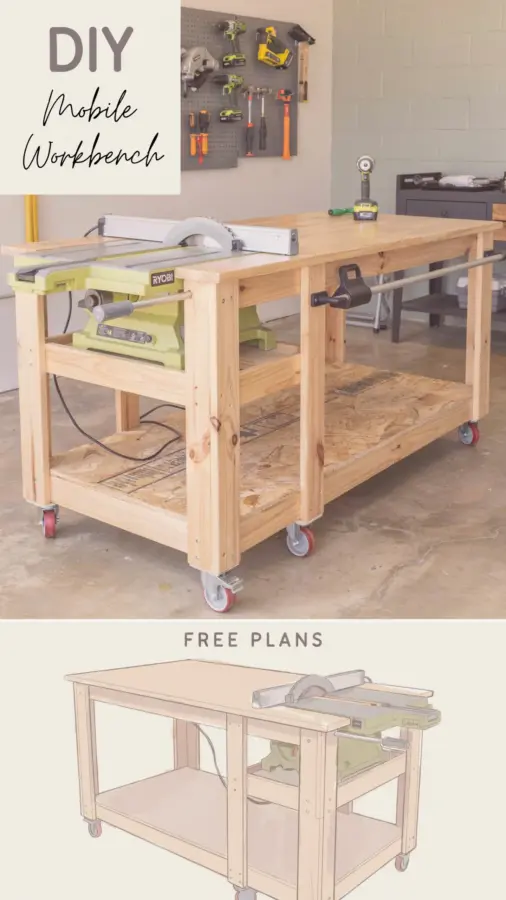
Why a Mobile Workbench Makes Sense for Small Shops
I remember the day I realized my garage had turned into a obstacle course of sawhorses, plywood scraps, and a table saw that seemed to take up half the room. That is when I started looking into a mobile workbench build. The idea of having a single sturdy station that could hold my saw, give me a flat surface for assembly, and roll out of the way when I needed parking space was a no-brainer. A mobile workbench build combines a worktable with a table saw integration so you can rip, crosscut, and glue up without constantly moving equipment around. For anyone with a small shop, this is the difference between frustration and flow.
The free plans from Bitterroot DIY are what finally sold me. They are straightforward, use common lumber sizes, and are built from the ground up with casters in mind. I have built a few workbenches before, but this one finally solved the problem of how to keep my contractor saw stable while still being able to sweep the floor underneath it. If you have been wrestling with a cramped workspace, this mobile workbench build might be exactly what you need.
Affordable DIY Mobile Workbench Plans That Actually Work
Let me be honest: I am not a professional woodworker with a unlimited budget. Most of my projects come from the offcuts bin and big box store sales. That is why I appreciate that the Bitterroot plans focus on affordable DIY mobile workbench plans using standard dimensional lumber. You can build the frame with 2x4s or 2x6s, and the top with a sheet of 3/4 inch plywood. No need for hardwood boards that cost a fortune.
The plans call for a plywood top that sits flush with the table saw surface, which means you get a big flat area for clamping and cutting. You can even add a sacrificial sheet on top later if you want to protect the surface. I built mine for under $100 (not counting the saw and casters) because I already had some screws and plywood scraps. For such a sturdy piece, that is a steal.
- Use construction grade spruce or pine for the legs and stretchers.
- Choose a 3/4 inch birch plywood for the top if you want a smooth surface that resists dents.
- Buy heavy duty swivel casters with locking brakes (at least 3 inch diameter) so the bench stays put when you are routing or sanding.
- Skip the branded hardware packs pick up a box of 3 inch deck screws and some wood glue instead.
How to Build a Table Saw Workbench on Casters (Without Losing Stability)
A common fear with any rolling workbench is wobble. I have seen guys bolt casters directly to a standard workbench and then watch it wander every time they push a board through the blade. That is why the design of a table saw workbench on casters needs to start with a rigid base. The Bitterroot plans use a torsion box style top or a thick plywood panel that ties into a lower shelf frame. That shelf does double duty: it stiffens the whole structure and gives you storage space for tools or dust collection.
When I built mine, I added a 2×4 cross brace between the legs at the bottom to prevent racking. Then I mounted the casters into a separate 2×4 block that sits inside the leg, not just screwed into the bottom of the plywood. That small detail makes a huge difference. The bench does not wiggle even when I am cutting heavy oak boards. If you are worried about the saw tipping forward, you can also add a couple of sandbags on the lower shelf. That is a cheap, effective stabilizer.
Small Workshop Organization Ideas You Can Borrow
Once you have the main workbench built, you will notice how much floor space you reclaim. But the real win is how this design encourages small workshop organization ideas. The open shelf underneath is perfect for storing a shop vac, a bin of clamps, or even a small dust collector. I mounted a power strip to the side of the bench so I can plug in my saw, a work light, and a charger without running extension cords across the floor.
Another smart move: attach a couple of French cleats to the sides or back of the workbench. Then you can hang things like a tape measure holder, a saw blade rack, or a small drawer for screws. For under $10 you can turn a simple bench into a command center. I also drilled a few holes in the top for bench dogs and clamps, which makes holding down workpieces a lot easier. All of these tweaks cost almost nothing but save you tons of time.
Budget Woodworking Workbench Build: Cutting Corners That Hold Up
When I was planning my budget woodworking workbench build, I had to decide where to save and where to spend. My advice: never skimp on the casters or the saw mounting hardware.
#mobileworkbench #diywoodworking #tablesawworkbench #workshoporganization #woodworkingplans
Leave a Comment