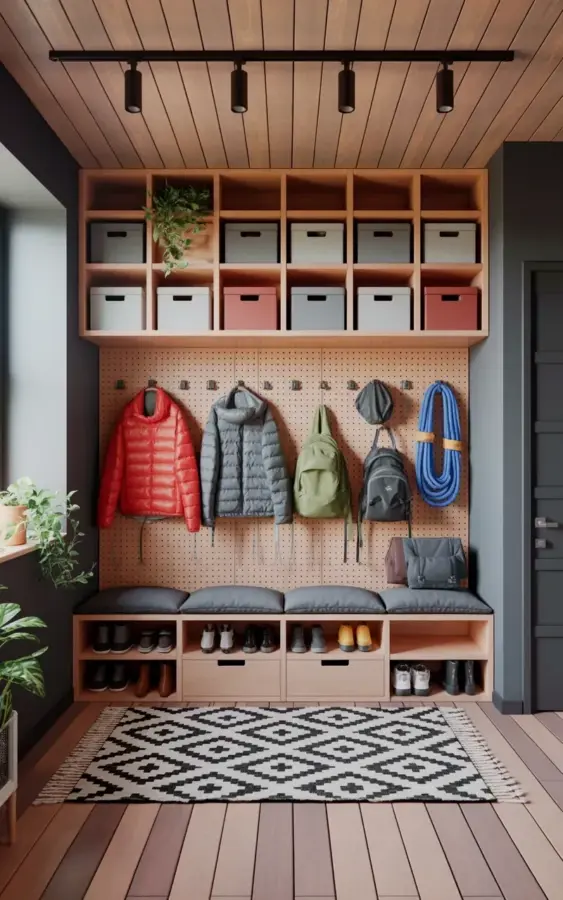
That red puffy jacket on the peg, the blue rope coiled neatly below it, three backpacks all hanging by their straps instead of lying in a heap on the floor. This is what real mudroom storage ideas look like when you actually use them, not just pin them. The photo I’m describing isn’t a magazine set; it’s a busy family’s entryway, and every single piece has a job.
The built-in cubby unit with the pegboard center is the whole system, and it works because it matches how a family really moves. You come in, drop the backpack on a hook, kick off shoes near the wood bench, and grab what you need for the next activity. No searching, no piling, no meltdowns at 7:40 AM. Here’s how you can steal the setup and make it work in your own mudroom.
How to plan a pegboard wall that keeps backpacks and jackets off the floor
Start by measuring a wall area that’s at least 36 inches wide. The pegboard you see in the photo is probably around 4 feet wide, and that’s plenty for a family of four. You don’t need a giant wall; you need the right spacing.
Mark your studs first, then cut a sheet of painted hardboard or metal pegboard to fit. Leave a 1.5 inch gap between the board and the wall using furring strips, otherwise the hooks won’t seat properly. That’s the mistake everyone makes. They hang the pegboard flush, then wonder why the hooks fall off when the kids slam the door.
Position the bottom edge about 12 inches above the bench height. You want jackets to clear the seat but stay easy for little arms to reach. Honestly, the lowest row matters the most. Make that row the one for backpacks. Then put the secondary hooks higher for parents and less-used gear like climbing rope or helmets.
Built-in cubbies vs. store-bought shelves: what actually works
Photo shows 16 cubby holes up top. That’s a lot of bins, and truthfully, most families don’t need that many right away. But if you’re building from scratch, a cubby wall gives you flexibility you can’t get from a cheap ready-made shelf unit.
The top row of cubbies is for the stuff you don’t want to see daily: extra hats, gloves, sunscreen, dog leashes, the random mail that never makes it to the kitchen. Use gray and brown storage boxes to hide the clutter. The photo does that beautifully, you see tidy fabric bins instead of ten pairs of mittens spilling out.
A green plant in one cubby is a nice touch, but I would move it lower. That’s just me. Kids grab things from those cubbies all the time, and a knocked-over pot of dirt is not a fun Tuesday afternoon.
Choosing hooks that hold climbing gear (and puffy jackets) without sagging
Not all pegboard hooks are created equal. The standard 4 inch hooks you get with a cheap pegboard kit will bend under the weight of a green backpack loaded with textbooks and climbing shoes.
You want heavy duty metal hooks with a rubber sleeve or a bend that prevents things from sliding off. For the blue climbing rope, use a deeper hook, maybe 6 inches, so the rope can be looped twice without falling. Puffy jackets are lighter, but they’re bulky. Use a round-top hook for those so the collar doesn’t get stretched out.
The red jacket in the photo hangs by its little loop, which is smart. Teach your kids to use that loop instead of shoving the hanger through the sleeve. It takes two extra seconds and keeps the jacket’s shape way longer.
The 16-cubby trick: assigning every family member a spot
Here’s the thing about a cubby wall. It’s only organized if you assign ownership. Give each person one large bin and one small bin. The large one holds seasonal stuff like a winter hat and extra gloves. The small one holds daily extras, maybe a phone charger or a bus pass.
Label everything. It doesn’t have to be fancy, just a strip of masking tape with a Sharpie. But make the labels on the outside of the bins, not the inside, because nobody wants to pull out five containers to find the dog leash.
In the photo, you’ll notice the bins up top are all closed boxes. That’s not accidental. Closed bins mean no one can see the mess, so the mess stays hidden until you choose to deal with it. Open baskets look cuter in Instagram photos, but they create visual noise. For a family mudroom, closed storage wins.
Make the whole area flow: from wooden plank ceiling to wood bench
The wooden ceiling planks and the long wood bench below the pegboard tie the whole thing together. It’s not a coincidence. When you have a warm wood ceiling, you need something at eye level and foot level to anchor the space.
A long wood bench is non-negotiable for a busy family. You need a place to sit when you’re pulling on climbing shoes or yanking off wet boots. Make it at least 12 inches deep and mount it securely to the wall studs. The one in the photo probably spans the entire width of the pegboard, which is ideal.
Add a simple shoe rack underneath the bench. The photo doesn’t show it in detail, but trust me, there’s always a shoe pile happening somewhere. A two-tier shoe rack with open sides lets you slide sneakers in without bending down. That little bit of effort saved matters when your hands are full of groceries and a preschooler is crying.
Why a pegboard is better than a coat rack for busy families
A coat rack only holds coats. A pegboard holds anything with a loop, a strap, or a hole. You can hang a bike helmet on one peg, a climbing rope on the next, and a green backpack on the one after that. You can’t do that with a row of wooden knobs, because the spacing is fixed and the hooks are too small.
Pegboard is also easier to rearrange. When the kids grow, or someone suddenly takes up archery, you just move the hooks. No drilling new holes into the wall or patching up old ones. That flexibility is the whole reason this system doesn’t fall apart after a year.
And it’s cheaper than a custom coat rack wall. A 4 by 8 sheet good quality pegboard costs around $20, plus a few dollars per hook. The built-in cubby frame is the more expensive part, but you can absolutely fake the look with a modular cube storage unit in the same color.
Weeks later, this is what I’d steal or change
I would steal the 16-cubby layout and the pegboard center row without hesitation. I’d also steal the idea of keeping the climbing gear visible, because if gear is out of sight, it gets forgotten. That blue rope in the photo isn’t decoration, it’s a reminder that adventure is available.
What I’d change? The green plant needs to go or drop to a lower cubby. I’d also add a small charging station in one of the lower cubbies, because everyone’s phone dies right when they’re about to leave for practice. A power strip inside a cubby with a cover is easy and keeps cords off the counter.
One last trick: put a small garbage bin near the bench. Not a big one, just a small metal bucket. It catches the crumbs from kids eating snacks while they wait for a ride, and it saves you from sweeping the entryway every single day. That’s the kind of simple addition that makes a mudroom feel like it actually runs itself.
So grab a pegboard, some heavy duty hooks, and a few closed bins. You don’t need a full built-in to start. Even a single pegboard panel above a bench can transform the worst shoe pile in your house into a system that works.
Try it this weekend, and feel free to steal the idea. Just maybe skip the plant.
Leave a Comment