You can spot the exact moment a pallet becomes more than shipping scrap. It is the moment you lean two weathered sections against a fence and realize they already look like a garden, they just need plants. That is how this project started: no big budget, no fancy tools, just two old pallets, some leftover stain, and a stubborn feeling that the backyard wall needed green.
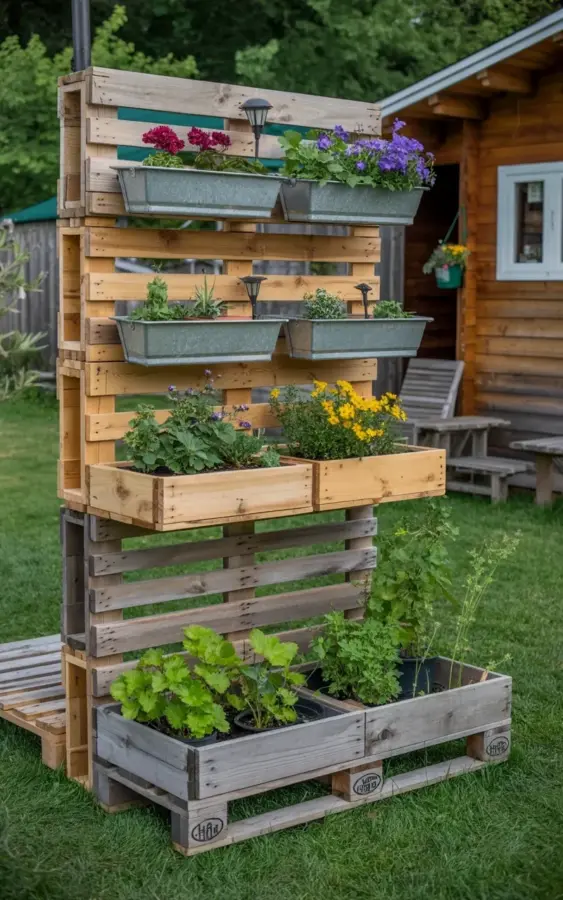
This pallet vertical garden uses two mounted pallet sections at different heights against a grass lawn. The top section holds three horizontal levels of metal planters, packed with purple flowers and trailing green foliage. The bottom section is a row of wooden planter boxes, full of yellow blooms, leafy greens, and the kind of herbs you actually use on a Tuesday night. The whole thing is stained in natural wood tones and gray, with small solar lights tucked around the edges, which means it looks good when the sun goes down too.
Why Repurposed Pallets Win for a Budget Garden
Look, lumber prices are not fun right now. New cedar planter boxes cost more than a decent dinner for two. A pallet costs nothing, if you know where to look.
Retail stores throw them out constantly. Hardware stores often have stacks out back that they are happy to give away. Just ask first, obviously. And here is the thing: pallets are already built for outdoor abuse. They survive forklifts, weather, and being dragged across concrete. A little rain in your backyard is nothing to them.
That rough, weathered texture also happens to look exactly like the expensive “rustic farmhouse” style from home catalogs. So you get the aesthetic for free, plus the honest story of where it came from. There is a real satisfaction in building a garden out of something that was headed for the dump.
What you actually pay for is the fun part: plants, soil, stain, and some hardware. That is the whole list.
How To Plan Your Pallet Vertical Garden Layout Before You Build
Do not skip this step. Honestly, the planning is what saves you from building something that looks crooked and sad.
First, lean your pallets against the wall where you want them to live. Step back. Look at the proportions. Walk around the yard. Then look again. You want to figure out the height, the spacing, and how much sun that wall gets during the day.
For this particular setup, the sections worked best at slightly staggered heights. The top pallet starts higher and stops around chest level, which makes the purple flowers easy to see from the patio. The bottom pallet is lower, good for herbs and spreading plants that you want to reach without stretching.
- Measure your pallet. Standard ones are about 40 by 48 inches, but they vary wildly. Use a tape measure, do not guess.
- Check the slats. Are they evenly spaced? Are any loose or split? You need solid boards to hold soil weight.
- Decide on planters. Metal tins and galvanized buckets fit neatly between slats. Wooden boxes need to be built or bought to fit the width.
Once you know the layout, mark the position on the wall with chalk or painter’s tape. This is your blueprint. It takes ten minutes and saves you from drilling holes in the wrong place.
Step by Step: Building the Pallet Structure for Your Vertical Garden
Ok so, the actual build is not complicated. You are basically attaching pallets to a sturdy support, then hanging planters on them. But the order of operations matters.
Start with the support structure. If you are mounting against a fence, use heavy-duty screws that are long enough to bite into the wood. If you are freestanding, like this backyard setup, you need posts sunk into the ground or angled legs attached to the back of the pallet. The goal is simple: the pallet must not tip over when a planter is full of wet soil. Wet soil is heavy. Heavier than you think.
Stain the pallets before you attach anything. Trust me on this. Painting around plants and planters is a nightmare. Use a natural wood tone and a gray stain to get that layered, two-tone look. Apply it while the pallets are flat on the ground, wait for it to dry completely, then stand them up.
When you secure the pallets together, use metal brackets at the corners. The photo shows two separate sections, but they can share a support post in the middle. That connection point is where the whole structure gains its strength. Screw everything tight. Give it a wiggle test. If it moves, reinforce it.
Choosing the Right Planters: Metal Tins vs. Wooden Boxes
You have options here, and the choice matters more than you might think.
Metal planters, like the ones holding the purple flowers on the top section, are great for drainage and for plants that like to dry out between waterings. They heat up fast in the sun though, which is fine for some species and lethal for others. In this design, the metal tins are set on the higher levels, where they catch direct sun without overheating the roots too much because they are elevated with airflow beneath.
Wooden planter boxes on the bottom section are the workhorses. They hold more soil, they stay cooler, and they give herbs room to spread their roots. Build these boxes from scrap wood if you have it, or buy simple untreated pine boxes and stain them to match the pallets.
Whatever you pick, make sure every single container has a hole in the bottom. Unless you enjoy watching your plants drown, you need drainage. I have killed more herbs with overwatering than with bugs, frost, or neglect combined. It is embarrassing.
Best Plants for a Pallet Vertical Garden: From Purple Flowers to Fresh Herbs
The beauty of this pallet vertical garden is that it holds so many different plants in one small footprint. You can have a flower garden and a vegetable patch in the same vertical space.
On the top pallet, go with purple flowers like petunias, verbena, or million bells. They cascade over the edge of the metal planters, so you get that full, lush look without buying a ton of plants. They also tolerate the heat better than some fussier annuals. Pair them with a few green foliage plants like ferns or sweet potato vine to fill out the gaps.
On the bottom pallet, use the wooden boxes for things you want to cook with. Rosemary, thyme, oregano, and parsley all do well in containers. Basil is a bit more thirsty but worth it if you remember to water it. Leafy greens like lettuce and spinach also thrive in the lower boxes because they prefer cooler conditions near the ground.
Mix in yellow blooms like marigolds or calendula for a pop of color that also attracts pollinators. Calendula petals are edible too, which is a fun little detail to mention when someone asks about the garden.
Adding Solar Lights and Finishing Touches for a Low Cost Garden
Here is the best trick for making a pallet garden look intentional: add lighting. Those small solar lights scattered around the structure do not cost much, but they transform the space at dusk.
Use the kind of solar lights that push directly into the soil or attach to the wood with stakes. Position them near the edges of the pallets, not dead center, so they illuminate the texture of the wood and the shape of the plants. The glow after dark makes the garden feel like a secret room in the backyard.
A few more finishing touches go a long way. Add a layer of mulch or pebbles on top of the soil to keep moisture in and prevent weeds. Use a drip watering system or just water carefully with a can, aiming at the soil, not the leaves. And tighten any loose screws you find in the first week because wood shifts and settles.
One random tip from personal experience: put a small tray or saucer under the lowest planters. When you water the top levels, gravity does its thing and drips down. The bottom shelf catches the mess, and you avoid staining the lawn. Not the most glamorous detail, but you will thank me later.
Maintaining Your Repurposed Pallet Garden Through the Seasons
Pallets are tough, but they are not immortal. The whole structure will last longer if you give it a little attention.
Check the stain every spring and reseal any areas that look gray or worn. This is not hard, just a brush and an hour of your time. Replant annuals when they get leggy or finish blooming. Herbs can get woody and bitter after a year, so replace them with fresh starts. Clean the planters out at the end of the growing season and store them in a dry place if you live somewhere with harsh winters.
The greenest part of this whole project is that none of it is permanent. You can take it down, move it, or reconfigure it whenever you want. That flexibility makes a pallet vertical garden a smart choice if you are renting, or if you change your mind about your yard a lot, like I do. Just remember to empty the soil before you move the pallets, otherwise you will be hauling around a lot of extra weight.
So that is the project. A weekend of work, a little bit of stain, and a wall that used to be empty is now growing dinner and flowers. It looks like the photo, right down to the purple blooms and the wooden boxes below.
If you decide to build one, start by hunting down a couple of good pallets. Check the stamp on the side for the letters HT, which means heat treated and safe for plants. Skip anything marked MB. Then lay out your space, grab some planters, and get growing. Save this one for your next garden project, you will be glad you did.
Leave a Comment