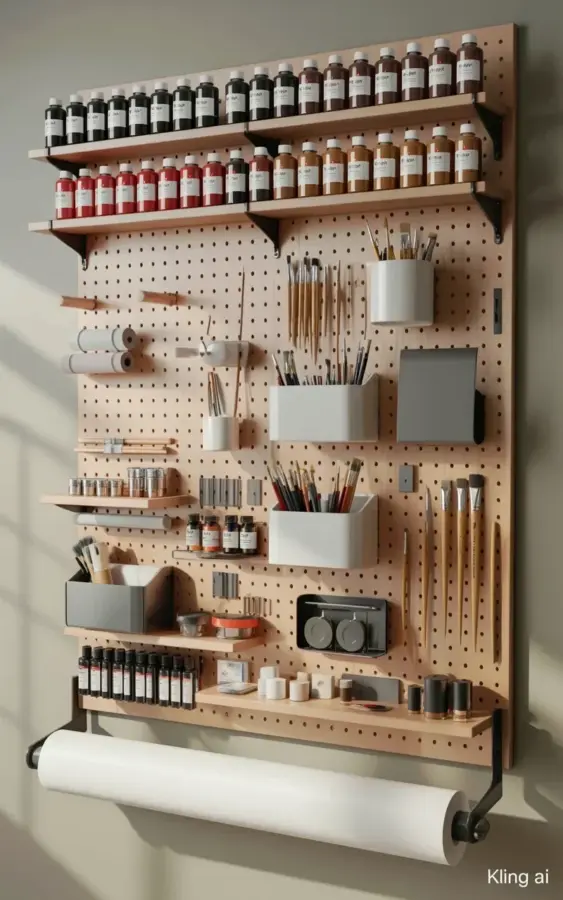
Ok so this photo of a pegboard art supply organization for paint bottles and brush holders is doing things to me. Normally I scroll right past studio tours, but look at those little red, white, and brown bottles lined up in rows. That light wooden pegboard panel with the black mounting holes? It’s not just pretty. It’s the kind of system that makes you want to actually sit down and paint. And honestly, that’s a win for anyone stuck with a tiny craft corner and a mountain of paint supplies.
I get it, you’re starting from zero and you don’t know where to put anything. That’s fine. This whole article is just me explaining how a pegboard works without assuming you’ve hung one before. No judgment. You’ll learn what hooks to buy, why those white brush holders are genius, and how to rig up a bottom shelf for all the stuff that doesn’t hang. By the end, you’ll have a clear picture of your own wall setup.
Why a Pegboard Wall Is the Smartest Way to Store Paint Bottles
Paint bottles are the worst to store on a flat counter. They roll, they fall behind jars, they collect dust. But when they’re hanging on a pegboard wall, they’re right at eye level. You can see every color at a glance. No digging through a drawer to find that one tube of burnt sienna.
The photo shows exactly why this works. The artist grouped red, white, and brown bottles in neat rows, leaving space between each color family. That’s not an accident. It’s a visual inventory. You know when you’re running low, and you know what you have available before you start mixing.
Honestly, the best part is how flexible this is. You can move a hook in five seconds. Painted over that pesky shelf? Move it. Need room for a taller bottle? Slide everything over. You can’t do that with a fixed shelf. That flexibility alone is worth the effort.
Here are the things I love about pegboard paint storage, in bullet form because lists make my brain happy:
- You can see every bottle and tube instantly, no rummaging.
- You can rearrange hooks whenever your supply changes.
- It uses vertical wall space, which is golden in a small room.
- You can hang brushes, palettes, scissors, and even rolled paper nearby.
- It’s cheap compared to custom cabinets or drawer organizers.
So if you were hesitating, stop. A pegboard wall is a solid plan for any small workspace.
Picking the Right Pegboard and Hooks for Your Art Supplies
You can’t just grab any pegboard and expect it to hold your heaviest paint bottles. Look, I learned that the hard way with a flimsy plastic panel that bowed in the middle. For paint supplies, you want a sturdy wooden board, like the light wooden panel in the photo. It’s thick enough to hold the weight without sagging.
The black mounting holes are standard, but the hooks are not all created equal. You’ll need a mix of straight hooks, loop hooks, and maybe a few small shelf brackets. Straight hooks hold bottles with collars or strings. Loop hooks are great for brushes with holes in the handles. And shelf brackets are what you use when you want to place a little wooden shelf on the pegboard for extra tubes.
If you’re mounting your pegboard to the wall, please use anchors. Painted drywall is not your friend. I once skipped anchors for a small board and found it on the floor the next morning. Not a fun way to wake up. Spend the few extra dollars on good hardware.
The Best Brush Holders for a Pegboard (and How to Use Them)
Those white cylindrical holders in the photo, they’re the real heroes. They keep paintbrushes upright and visible, which is exactly what you want. When brushes lie flat in a drawer, their bristles get bent. Upright brushes keep their shape and stay cleaner.
You can find metal mesh holders that hook onto the pegboard directly. Or you can make your own by attaching a small plastic cup or a tin can to a pegboard hook with zip ties. The white ones in the photo work so well because they’re deep enough to hold a bunch of brushes without them wobbling.
Here’s a trick I don’t hear people mention often. Group your brushes by size or by use. Put the filbert brushes in one holder, the round tips in another, and maybe keep a separate holder for your beater brushes that are past their prime. That way you’re not sorting through a jumble every time you want to paint a wash.
Also, make sure the brushes are dry before you stick them in. Damp brushes sit in a closed-ish holder and stuff can grow. Not gonna lie, I’ve ruined a favorite brush that way. Now I rest them on a towel for a few hours before storing.
Making the Most of a Bottom Shelf for Paint Tubes, Paper, and More
The bottom shelf in the photo is doing a lot of quiet work. It holds extra paint tubes, rolled paper, and a few loose supplies. That’s a smart move because not everything can hang from a hook. Tubes are awkward, and rolled paper needs a flat surface or it unrolls everywhere.
You can buy a pegboard shelf kit that clips right onto the board. They’re usually little wooden ledges with a bracket that fits into the holes. Look for one that sits at a slight angle, so things don’t tumble off the front. The shelf in the photo looks deep enough to hold tubes without them rolling over the edge.
For rolled paper, just stand them up on end in the shelf. I’d recommend placing a heavy book or a brick on the bottom of the roll to keep it from unrolling, but that’s a personal quirk. Actually, you could also use a binder clip on the end. That works in a pinch.
One thing I wish someone told me earlier: don’t overload the bottom shelf. It’s tempting to pile everything there because it’s easy. But the point of the pegboard is visibility. If the shelf becomes a black hole, the system breaks down. Keep it to a single row of tubes and a few rolls.
Setting Up a Small Workshop Wall or Craft Corner Without the Overwhelm
You don’t need a big room. You need a wall. A little corner with a desk and a wooden pegboard is enough. The photo is proof. That entire setup fits on one panel, and it serves a whole painting studio.
Start by clearing your wall. Measure the space you have. Then pick one category of supplies to tackle first. Don’t try to organize everything in one afternoon, you’ll just make a mess and quit. I recommend starting with paint bottles and brushes. Those are the things you actually reach for daily.
Second, gather your supplies. You need the pegboard, hooks, shelf brackets, and something to mount it with. A power drill and a level will save you a headache. Also, keep a pencil handy to mark the hole locations. It’s a little boring, but it works.
Third, lay out your paint bottles on the counter below the pegboard. Group by color or by type. Then hang them up one row at a time. Leave a little space between each bottle so your fingers can wrap around them when you pull one off.
For the brushes, place the white cylinder holders on the lower half of the pegboard, right in front of where you’ll stand. That keeps the most used items at arm’s reach. The upper rows can hold decorative stuff or supplies you use less often.
Does a DIY Studio Pegboard Actually Live Up to the Hype?
Yes, but only if you actually stick with the system. I know people who buy a gorgeous pegboard setup, use it for a week, then let everything pile up again. The trick is to keep the rules simple. Put things back after every session. Don’t stuff the shelf with junk just because it’s there.
My own diystudio has a pegboard that’s not as pretty as the one in the photo. There’s a bent hook on the left side that I’ve been meaning to replace for six years. I keep it because it forces me to slow down and wiggle my palette when I hang it. It’s a tiny human ritual in the middle of all that organization. Anyway.
If you search #pegboardorganization on Pinterest, you’ll see hundreds of variations. Some are wildly neat, some are messy-friendly. This particular photo is one of my favorite artstoragesolutions because it mixes wall-mounted bottles with shelf-based rolls. It’s practical and repeatable. And craftroomideas like this are easy to copy without buying expensive cabinets.
So what would you hang on yours? That’s the fun part. Sponges, palette knives, washi tape, maybe even your favorite old CD for a palette. A pegboard works with whatever you throw at it.
Look, just start with one small board. Hang a few bottles. Add a brush holder. See how it feels. If it makes you paint more, that’s all the validation you need. If not, you can always move the holes around. There’s no permanence here, and that’s exactly why this system is worth trying. Go hang something.
#pegboardorganization #artstoragesolutions #paintsupplies #craftroomideas #diystudio
Leave a Comment