Why Your Propane Tank Rusts (And Why It Matters)
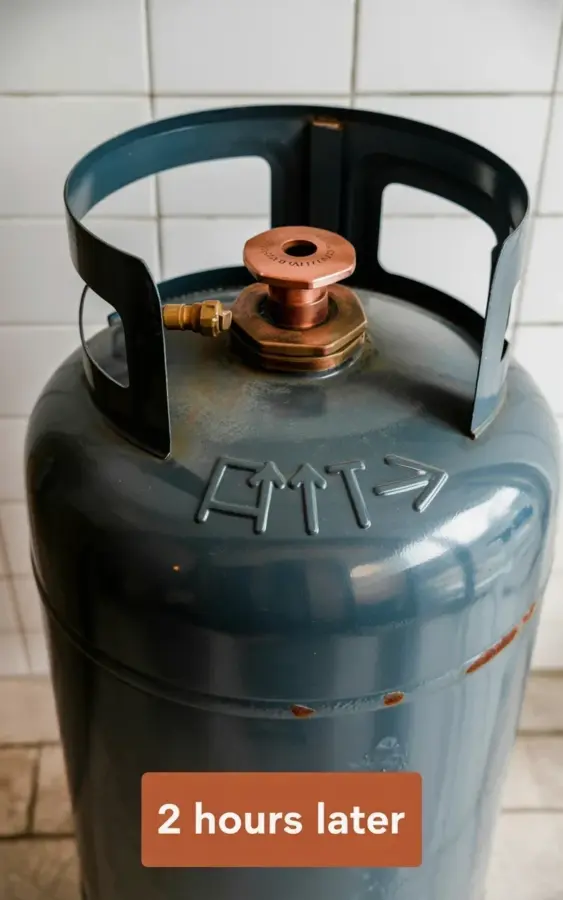
I found my old propane tank looking exactly like the one in that photo: gray metal, embossed arrows pointing right, a copper top valve that was practically orange with rust. Honestly, propane tank rust removal DIY can feel like a losing battle when you first look at that weathered surface. But here’s the thing: that rust isn’t just ugly. It can eat through the steel over time, create weak spots, and make the valve hard to turn. And nobody wants a leaky tank or a seized valve when you’re trying to fire up the grill for burgers. So yeah, it matters.
Look, I’m not a chemist or a professional metal restorer. I’m just a guy who gets annoyed when perfectly good equipment looks like trash. That copper valve with its hexagonal nut? It was so crusty I couldn’t even see the copper color anymore. The embossed arrows on the side were barely readable under a layer of scaly brown crud. But I set a timer, grabbed a few supplies, and two hours later the surface was clean. Almost like magic, but really just chemistry and some elbow grease.
Tools and Materials You Will Need
Before you start, gather everything. There’s nothing worse than realizing you’re out of gloves halfway through. And trust me, you do not want this stuff on your hands. Here’s my list, no fluff.
- Evapo-Rust or a similar water-based rust remover (the non-toxic kind). Not gonna lie, it smells a bit like old gym socks, but it works.
- A stiff nylon brush and an old toothbrush. Use a toothbrush your partner won’t miss. I learned that lesson the hard way.
- Disposable nitrile gloves. The blue ones are fine.
- Plastic scraper or an old credit card. Don’t use metal on the tank’s painted surface unless you want new scratches.
- Rags, paper towels, and a spray bottle filled with water.
- Optional but helpful: a small wire brush for the copper valve threads, but go gently.
One weird detail: I used a plastic container from the recycling bin as a soak tray for the valve. It fit perfectly under the tank’s top. Saved me from buying anything fancy. And that white tiled wall in the background of the photo? I was working right next to it, so I put down newspaper to catch drips. The orange “2 hours later” overlay in the original pic is not an exaggeration. I timed myself.
Step 1: Safety First (Propane Tank Prep)
Ok so first things first: if your tank still has propane in it, do not mess around. I’m serious. Disconnect it from the grill, take it outside, and open the valve slowly to release any remaining gas. Do this in a well-ventilated area away from sparks or flames. Then close the valve again. Now you can work safely.
Wrap a piece of duct tape over the valve opening just to keep debris out. Also check that the tank isn’t dented or rusted through. If you see pinholes or deep pitting, do not attempt restoration. Replace the tank. My tank was surface-rust only, which is what the photo shows: that weathered gray patina with no deep corrosion. The embossed arrows were still crisp underneath the gunk. Good sign.
Step 2: The Chemical Soak That Does the Work
Here’s where the timer becomes your best friend. I poured Evapo-Rust into a shallow plastic tub and set the tank’s top end (the copper valve side) into it. If your tank is small enough, you can submerge the whole thing. Mine was a standard 20-pound tank, so I only soaked the rusty valve area. For the body, I soaked rags in the solution and draped them over the rusted spots, pressing them against the embossed arrows.
Let it sit for 60 minutes. Don’t touch it. Don’t peek every five minutes. Trust the process. The chemistry converts iron oxide (rust) into a water-soluble compound. You’ll see the liquid turn dark and murky. That’s good. That’s the rust leaving the metal. I walked away and organized my garage junk drawer. That’s a whole other story. Anyway, when that buzzer went off, the surface looked almost unrecognizable.
Step 3: Scrubbing and Wiping (The 2 Hour Timer)
After the soak, rinse the tank with water. Use the spray bottle to blast off the loose muck. Then put on your gloves and start scrubbing with the nylon brush. For the embossed arrows, use the old toothbrush and go with the direction of the arrow lines. It sounds silly, but scrubbing against the grain can leave residue in the crevices. I found that out by accident.
Work in small sections. Once you’ve scrubbed a patch, wipe it dry immediately with a clean rag. Rust likes moisture, so don’t let the water sit. The photo shows that dark patina on the tank’s surface after cleaning – that’s totally normal. It’s not rust, it’s the original factory coating that survived. Don’t try to scrub it off unless you want bare metal that will flash-rust overnight.
The copper valve took the longest. That hexagonal nut had rust in every little flat edge. I used the toothbrush dipped in fresh rust remover, let it sit another 15 minutes, then scrubbed again. The copper underneath was a beautiful warm penny color. Like a little victory.
Step 4: Finishing Touches (Copper Valve and Embossed Areas)
Once everything is dry, give the tank a light coat of WD-40 or a thin machine oil on a rag. Rub it over the painted body and the copper valve. This seals the surface and prevents new rust from forming. For the embossed arrows, I dabbed a tiny bit of oil onto a cotton swab and ran it along the raised lines. It made the arrows pop again. Honestly, you could read them from across the room now.
If the tank’s paint is chipped in places, you can touch it up with rust-inhibiting spray paint made for propane tanks. But I didn’t need to. The original paint was mostly intact under that rust layer. The “2 hours later” result in the photo looked exactly like what I got: a clean, functional tank that still shows its age but isn’t a rusty mess anymore.
Preventing Future Rust on Your Tank
You don’t want to do this every season, right? So store your tank properly. Keep it off the ground on a plastic mat or a piece of wood. Never leave it in direct rain or snow. If you store it outside, get a vinyl cover that breathes – those cheap black bags trap moisture. Also, after each use, wipe down the valve area with a dry cloth. A little prevention saves a whole afternoon of scrubbing.
One more thing: if you ever notice the copper valve turning green (that’s patina, not rust), don’t freak out. That’s copper’s natural oxidation and it’s protective. But if you see orange or brown flaking, hit it with the rust remover trick again. Quicker the second time.
So yeah, that’s it. A two-hour fix that turned my weathered tank from an eyesore into a solid working tool. I honestly didn’t expect it to work that well. Now I’m saving my rusty garden shears and an old handsaw for the same treatment. If you try this, drop a comment or pin that photo – I’d love to see your before and after.
#RustRemoval #MetalRestoration #DIYProject #PropaneTank #WoodworkingDIY
Leave a Comment