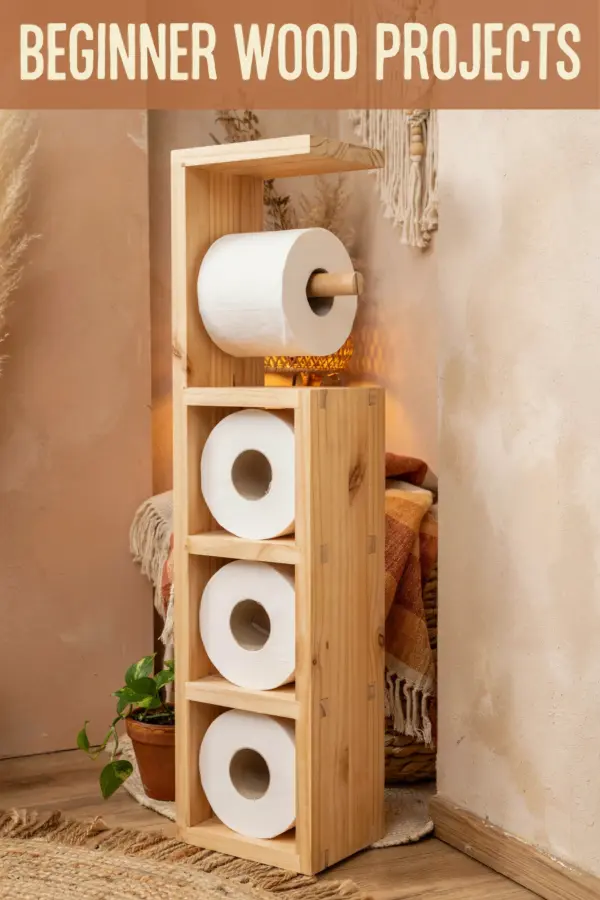
Why I Built This Scrap Wood Toilet Paper Holder with Shelf
Last winter I finally tackled a nagging problem in my small guest bathroom. There was never a good spot to store extra rolls. The under-sink cabinet was packed with cleaning supplies, and the back of the toilet looked cluttered. I wanted something that held the current roll and stored a few backups without taking up floor space. That is when I decided to build a scrap wood toilet paper holder with shelf. I had a pile of leftover lumber in my workshop, mostly 1×6 pine and a few short scraps of poplar. I figured this beginner woodworking project would be a perfect way to use that wood and create something truly functional. It took me about two hours on a Saturday morning, and the result has been used every single day since.
What Makes This a Great Easy Bathroom Storage for Small Spaces
This holder is designed to hang right next to the toilet. The shelf part sits above the roll and holds three extra rolls in a neat stack. For a small bathroom or a half-bath, that extra storage makes a big difference. You do not have to reach into a cabinet or keep a spare roll on the tank. Everything is right there.
I specifically used a shallow shelf depth, about 5 inches, so it does not stick out too far. That was a lesson from my first attempt two years ago. I built a deeper shelf and it kept bumping my knee. This version sits flush against the wall and feels almost invisible when you are not using it. The open design also means it is easy to keep clean.
Simple Joinery Techniques That Actually Work for Beginners
If you are new to the woodshop, do not worry. This scrap wood toilet paper holder uses only butt joints and pocket holes. I used a Kreg jig for the pocket holes, but you could also use dowels or even glue and nails. The key is to make sure your cuts are square. I always check with a combination square before I clamp or drill.
For the main body, I cut a back piece, a shelf piece, and two side pieces. The shelf sits inside the sides, supported by pocket holes from underneath. The back piece is glued and pin-nailed to the sides and shelf. That gives the whole thing a solid, rigid feel. No fancy joinery required. I have built three of these now for friends, and every one has held up perfectly with just glue and screws.
Wood Shop Tips for Using Leftover Lumber Successfully
Here is what actually worked for me with scrap wood. I sorted through my pile and picked pieces that were straight and free of large knots. For the visible front edges, I chose poplar because it sands smooth and takes paint well. The rest came from a construction-grade 1×6 pine that had been sitting in my workshop for a year. I ripped it to width on my table saw, but a circular saw with a straightedge works just fine.
- Pick dry, stable wood. Scrap that has been in a dry indoor space for a few months is less likely to warp later.
- Plane or sand before cutting to size. I run each piece through a thickness planer or use a hand plane to remove any rough saw marks. This saves time later.
- Write dimensions on the wood with a pencil. I cut the back piece to 18 inches tall, the sides to 16 inches, and the shelf to 12 inches long. It helps to label them so you do not mix up cuts.
- Test-fit dry. Before any glue, I clamp the pieces together and check for gaps. Much easier to fix now than after glue dries.
One mistake I made early on was using a piece of wood that had a slight bow. It made the shelf uneven. Now I always lay the scrap on a flat surface and look for daylight underneath. If it rocks, I find a different piece.
Free Woodworking Plans for This Toilet Paper Holder
I put together a simple set of plans after building the first version. They include a cut list, a 3D diagram, and step-by-step photos. You can get them for free from my site (link at the end of this post). The plans are designed for a standard toilet paper roll. That means I measured the width of the roll plus 1/8 inch clearance. The slot in the front where the roll hangs is 4.5 inches wide and 3.75 inches deep. That depth leaves enough room to slide the roll in and out easily but keeps it from falling off.
I also made the shelf opening tall enough to hold three rolls stacked horizontally. Each stackable opening is 5.5 inches tall. If you use bulkier thick rolls, just add a quarter inch. I have tested this with Costco packs and it works fine.
Carpentry Project for Guest Bathroom that Looks Clean
Because this is a visible piece in a small space, I wanted a clean finish. I sanded everything to 220 grit, then applied two coats of water-based polyurethane in a satin sheen. The poplar edges took the finish nicely, while the pine absorbed more and
#woodworking #workshop #woodshop #carpentry #DIYbathroom
Leave a Comment