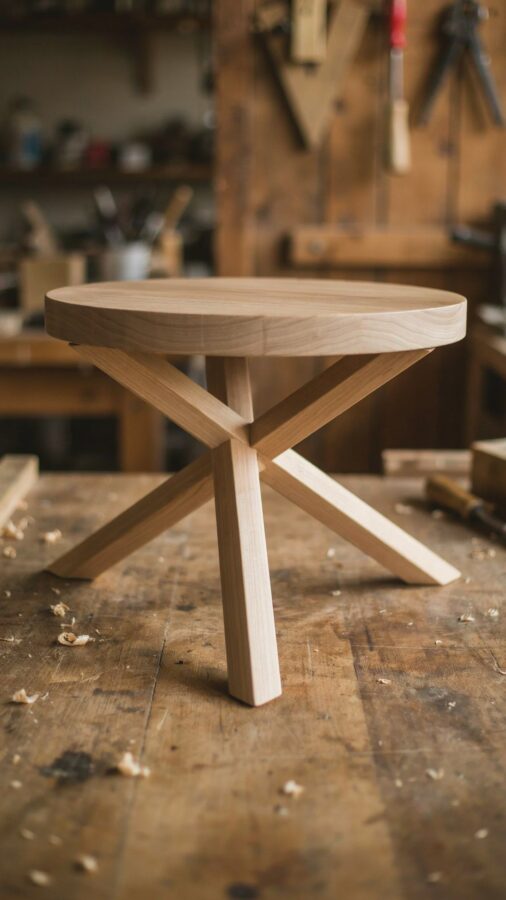
Building simple wooden table legs from just three sticks is one of the most satisfying beginner woodworking projects I have tried. The concept is almost too easy: three straight pieces of wood arranged in a clean geometric triangle. Yet the result looks modern, intentional, and surprisingly sturdy. This three stick design is perfect for small furniture projects or restoring a thrifted table that needs a fresh base. The geometric shape adds a quiet modern charm that works in any room, from a cramped apartment balcony to a cozy reading nook. Over the years I have built several variations of these legs, and each time I am reminded how a few straight lines can transform a piece.
Choosing the right wood for a minimalist table leg build
Not all wood is created equal for this project, especially if you want that minimalist look to last. I recommend starting with common dimensional lumber like 2x2s or 1x2s from a hardware store. Pine is cheap and easy to cut, but it is soft and can dent if you drop a coffee mug on it. For a bit more durability without breaking the bank, poplar is a solid middle ground. It sands smooth and takes paint evenly.
If you prefer a natural wood grain for a warmer feel, try red oak or birch. These hardwoods cost more but they will hold up better over time. For a true minimalist aesthetic, stick with square or rectangular stock. Avoid warped boards; check each piece by sighting down the length before buying. A straight stick makes all the difference when you are joining them into a triangle.
Restoring a thrifted table with these three stick legs
I found an old round end table at a thrift store for eight dollars. The top was in decent shape but the original legs were wobbly and dated. That is exactly the situation where this three stick design shines. You remove the old legs, clean up the top, and screw on your new triangular base. The contrast between a vintage tabletop and modern geometric legs creates a unique piece that looks custom made.
For a thrifted table, measure the existing apron (the frame under the top) to know how wide your leg triangle needs to be. A good rule of thumb is to make the legs about three quarters of the table top diameter. Use a simple miter saw or hand saw to cut three equal lengths, then join them at the corners with wood glue and pocket hole screws. Sand everything smooth before attaching to the table. This type of diytable restoration costs under twenty dollars and takes an afternoon.
Three stick legs for a compact side table you can build in one day
A small side table is one of the most practical projects for using this leg design. The three sticks form a tripod base that takes up minimal floor space, perfect for next to a sofa or bed. You can pair it with a simple plywood circle or a salvaged wooden board as the top. I built one for my daughter’s tiny reading corner and she uses it for a lamp and a book.
Cut three sticks of equal length, around 18 to 24 inches depending on your desired height. Use a drill to create angled pilot holes for screws that join the sticks at the top. A quick tip: cut a small notch in each stick where they meet to create a tighter joint. This prevents any wobble. Add rubber feet to the bottom for grip. The whole thing is sturdy enough for a potted plant or a stack of magazines.
Using paint and stain to match your minimalist furniture style
Minimalist furniture often relies on color to define the look, and these simple legs are a blank canvas. White painted legs give an airy, Scandinavian feel that works in bright rooms. Black matte paint makes the legs disappear visually but adds a sharp graphic line against a light top. I have also used a clear satin polyurethane on natural birch to keep the wood tone clean and subtle.
If you want a warmer vibe, try a light wash stain that lets the grain show through, or a dark walnut stain for contrast. For a playful twist, paint just the inner edges of the triangle a bright color like mustard or teal. That hidden pop of color is a conversation starter without overwhelming the room. The key is to test the finish on a scrap piece first, since different woods absorb stain differently.
Essential tools and cutting tips for the diytable leg project
You do not need a full workshop for this build. Here are the basic tools I use every time:
- Miter saw or hand saw for cutting equal lengths
- Drill with screwdriver bits for assembling the legs
- Sandpaper in 120 and 220 grit for smoothing edges
- Wood glue for added strength at the joints
- Measuring tape and a square to mark straight lines
A miter saw is convenient, but you can get clean cuts with a circular saw and a straightedge guide. Clamp your wood pieces together after cutting, then mark the joining angles. The three sticks meet at the top in a Y shape. I usually cut a small flat on the end of each stick so they sit flush against each other. Pre drill holes to avoid splitting the wood when you drive screws in.
Making the legs adjustable for uneven floors
One issue I ran into with my first set of legs was wobbling on a slightly uneven floor. The simple fix is to add adjustable leveling feet to the bottom of each stick. You can buy metal or plastic furniture levelers at any hardware store for a couple of dollars. They screw into a
#woodworking #woodentablelegs #diytable #minimalistfurniture #woodcraft
Leave a Comment