Let me guess: your entryway looks like a winter coat explosion right now. Puffy jackets draped over banisters, gloves scattered in pairs that never stay together, and a climbing rope tangled with the dog leash. I have been there. And honestly, building a proper entrywayorganization system with built-in cubbies and pegboard storage was the single best decision my family made this year. But here is the thing – we made a ton of mistakes along the way. So I want to walk you through the most common blunders so you can skip the frustration and land on a setup that actually works for an active family that needs to grab and go.
Mistake 1: Treating All Cubbies Like Empty Boxes
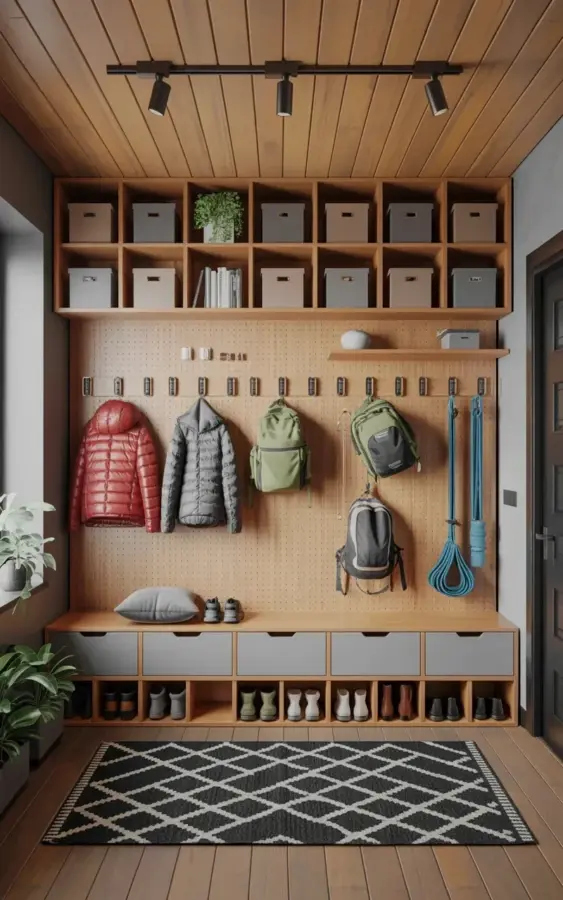
You see those 16 cubby holes in the photo above? Gray and brown bins sitting neatly, a green plant adding a little life? That did not happen by accident. The most common mistake people make is just stacking random stuff into cubbies. Hats here, gloves there, maybe a scarf shoved in. Two weeks later nobody can find a matching pair.
Here is the fix: label every single bin. Not cute labels, real labels. I use a label maker, call me crazy. One bin for “Thick Gloves,” one for “Fleece Neck Warmers,” one for “Beanies.” The kids know exactly where to grab. And when you have a bin specifically for hats and gloves, you do not end up with a tangled mess. (Plus, a labeled bin means you can actually see when you need to buy more – I learned that after a freezing soccer game with zero spare mittens.)
Mistake 2: Overcrowding the Pegboard with Too Many Hooks
Pegboard storage is amazing for winter gear and climbing gear. In our setup, the red puffy jacket hangs right above the bench, next to a gray puffy jacket, then the green backpacks and a loop of blue climbing rope. Everything has its own hook. But I see so many people jam hooks into every single hole, thinking more is better. Wrong. You end up with jackets bumping into each other, ropes snagging on backpack straps, and that one hook that never gets used.
My rule of thumb: leave empty spaces. Let the pegboard breathe. A hook every 6 inches or so, grouped by use. Jackets on the left, backpacks in the center, climbing gear and rope on the right. That way you can grab your red puffer without wrestling a carabiner out of your sleeve. And if you get new gear later, you have room to add a hook. Not all at once.
- Group by activity – winter coats together, climbing gear together.
- Leave gaps between hooks so items do not overlap.
- Use the bottom row for heavy gear (ropes, crampons) so nothing pulls the pegboard down.
Mistake 3: Forgetting the “Grab and Go” Workflow
Here is a weird detail about our entryway: the climbing rope is always the last thing I grab on my way out. So it hangs on the rightmost hook, closest to the door. The hat and glove bin is on the bottom shelf, at knee height so I can sit and pull it open. You would think that is obvious, but people design their mudroom based on how it looks, not how it moves.
The mistake is not mapping out the morning rush. Do you put on boots first or jacket? For us, boots go on while sitting on the long wooden bench below the pegboard. The bench has a cubby underneath for shoes. Then we stand up, grab the jacket off the hook, pull on the backpack, and snag the rope. Everything flows left to right. If your setup forces you to zigzag across the room, you will just toss coats on the floor. I am not joking – I used to do that. The bench is key. Do not skip the bench.
Mistake 4: Ignoring Wet, Snowy, and Muddy Reality
Look, winter gear comes into the house wet. Snow melts off puffy jackets, gloves get damp, climbing ropes hold moisture. If you stash those directly into a closed bin, you get mildew. I made that mistake with a bin of wool beanies – they smelled like a wet dog for months. Not gonna lie, I threw them out.
How to avoid it: choose open cubby bins with ventilation (those woven fabric bins? No. Wire or slotted plastic is better). Or hang wet stuff loose on the pegboard until it dries, then move it to the bin. In our system, the gray puffy jackets and red jacket hang freely, air drying overnight. The climbing rope gets looped over a pegboard hook specifically for wet ropes – I put a small dish towel under it to catch drips. Yes, I am that meticulous, but it saves gear. And for hats and gloves, the labeled bins have small gaps at the sides so moisture escapes. If you must use solid bins, leave the lids off in winter.
Mistake 5: Thinking One Pegboard Fits Every Family
Our pegboard section is about 4 feet wide, centered between the upper cubby shelves. But every family is different. I know a family that climbs every weekend – they needed extra heavy-duty hooks for a rope bag and quickdraws. Another friend has three kids, so she installed a second pegboard lower down for the little ones’ coats. You cannot just copy a photo and expect it to work.
Consider your actual gear. Do you have a climbing helmet? A pegboard hook with a wide collar works. Skis? You need a horizontal rack. Winter boots with ice cleats? A low shelf next to the bench is better than a hook. The common mistake is buying a generic “entryway organization” kit and hoping for the best. Instead, lay out every single item you need to store – jackets, backpacks, ropes, dog leash, reusable grocery bags – then plan hooks and cubbies around that list. Add 20% extra space for future gear. That green plant in the photo? It fills an empty cubby I originally planned for something else. But you know what? That empty spot is my “I’ll figure it out later” zone, and that is perfectly fine.
Mistake 6: Overlooking the Floor and Ceiling Vibe
Ok, so this is not strictly about storage, but it matters. Our entryway has a wooden plank ceiling and floor – that warm, rustic look makes the pegboard feel intentional, not like a workshop wall. A lot of people install a pegboard system without thinking about how it connects to the room’s style. They just screw it onto drywall, and it looks like a hardware store shelf.
To avoid that, frame the pegboard with wood trim, or paint the board to match your wall color. We kept ours natural wood to match the ceiling planks. The long wooden bench below ties it together. Even the bins – gray and brown – were chosen to complement the wood tones. If you have a white modern mudroom, use white pegboard and acrylic bins. Do not fight your existing aesthetic. The goal is a system that feels like it belongs, not an eyesore you hide with a coat.
One more hyper-specific thing: I have a weird obsession with the space above the top cubbies. Our ceiling is high, so there is a 6-inch gap between the top shelf and the ceiling. I put a small LED strip there, hidden behind a trim piece. It glows softly, lighting up the cubby labels at 6 a.m. when I am half asleep. Not necessary, but it makes the whole setup feel like a custom mudroom, not a DIY project. Little touches matter.
So there you go. Six mistakes that turned our chaotic entryway into a functional, winter-ready system that actually holds climbing rope without tangling in the dog leash. Honestly, the biggest lesson is just: plan for the mess, not for the Instagram shot. That red puffy jacket will get grubby, the blue rope will get wet, and the green backpack will be half-zipped. But with labeled bins, a pegboard that breathes, and a solid bench to sit on, you can walk out the door in 90 seconds flat.
Which mistake are you guilty of? I am the one who overstuffed the pegboard – I had to remove three hooks last week. Drop your thoughts in the comments or save this post for your own mudroom makeover. Your winter gear will thank you.
#entrywayorganization #pegboardstorage #mudroomideas #wintergearorganization #climbinggearstorage
Leave a Comment