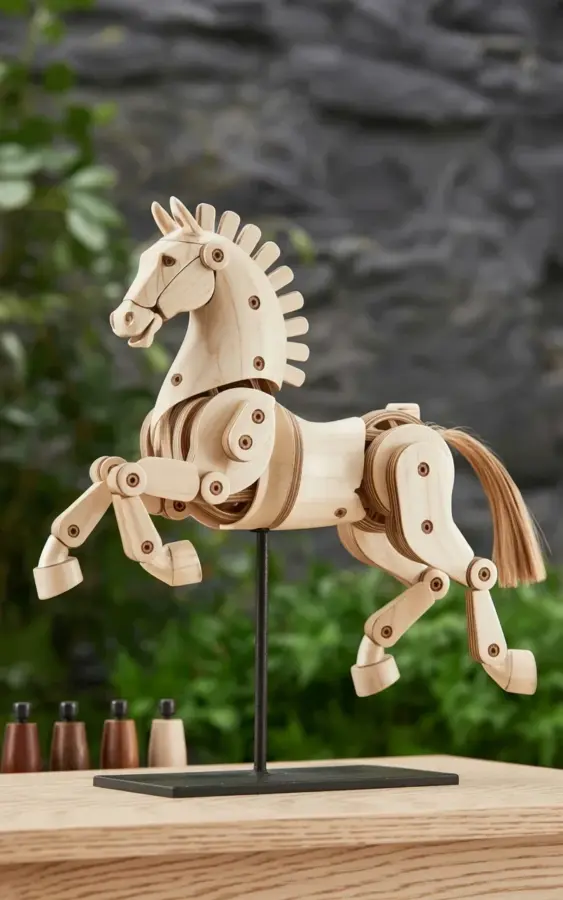
Somewhere in the shop, the smell of sawdust and the low hum of a scroll saw means spring has officially arrived. I found myself staring at a photo of a light beige wooden horse, mid-gallop forever on a black metal stand, and honestly, I could not stop thinking about the joints. All the little moving parts, the tiny wooden pegs, the mechanics of the thing. It is such a cool piece of **woodworking** and **woodenart**, and it hit me how perfect a project like this is for a handmade, heartfelt Father’s Day gift.
Here’s the thing: building a mechanical horse looks impossibly hard, but the real challenge is not the carving. The magic is in the timing and the fit, and I made enough mistakes on my first attempt to fill a book. So let’s skip the frustration. This is a plain-spoken guide to the top mistakes people make when building a kinetic sculpture like this, and exactly how to sidestep the heartbreak.
## Not Choosing the Right Wood for the Kinetics
The biggest mistake I see is grabbing whatever scrap of hardwood is lying around. Poplar and oak are heavy, and if you use them for a running harness with delicate pins, those legs will either bind up or wear out quickly. You need something light and stable, but with enough density to hold a tiny peg without splitting. Basswood is the honest winner here. It cuts like butter, which is a blessing when you are working on those small connecting rods.
I also want you to pay attention to the grain direction. If the grain runs across a thin leg section, that piece is a ticking time bomb during assembly. You want the grain lines running along the long axis of the limbs, just like natural bone structure. This gives the legs the strength to actually swing when someone moves the horse.
## Rushing the Pattern and Mechanical Horse Measurements
I get it. You have the plan on screen, you have traced it roughly, and you want to hear that scroll saw sing. But a kinetic sculpture is a machine, and a machine hates sloppiness. If your left legs are a fraction shorter than the right side, the horse will rock when it stands on a flat surface. It is a real dead giveaway of a rushed job.
Here is what works better than tracing by eye:
– Print the pattern out at 100% scale.
– Spray-mount it to the wood to stop it shifting.
– Drill your axle holes *before* you cut the shapes out.
– Test fit the pegs in the holes before the parts are separated from the block.
That last one sounds strange but it saves you. It is way easier to clamp a whole block down to fix a tight hole than to try and hold a tiny wooden hoof while you re-drill it.
## Ignoring the Importance of the Joint Clearance
This is where the magic happens. The mechanical horse sculpture in the reference photo works because the parts move with a smooth, fluid motion. If you fit the joints with zero gap, the wood swells and the whole toy freezes up. If you leave too much room, the legs flop around like a fish and the kinetic motion looks cheap.
The sweet spot is barely visible. A hair’s width of space between the moving parts, just enough to slide a piece of receipt paper through. I usually sand the axle pins to a satin finish and then add a tiny bit of paste wax to the joint before final assembly. It makes the mechanism feel silky, not sloppy.
## Assembling the Sculpture Before a Dry Run
I know the excitement. You have all the finished pieces, and the throat of your drill press is tempting you to just set the pegs and be done with it. Don’t. I did this once, and my horse ended up looking like it was trying to climb a hill sideways. The legs were moving, but not together, and everything was locked in place.
Dry fit everything first. Use a temporary clamp or even a rubber band to hold the body parts together. The pivot points should move freely with a slight bit of tension. Listen to the wood. If you hear a clicking sound, that means a pin is hitting an edge or the hole is slightly off-center. Fix it now, because once you glue those pins in with epoxy glue, there is no going back.
## Neglecting the Stand and the Finishing Process
Everyone obsesses over the moving legs and forgets the base. But the black metal stand is what makes the horse look like it is suspended mid-jump. It gives the sculpture a defined purpose. Without a solid stand, your beautiful kinetic work is just a toy sitting on the bench. A heavy steel or iron base also lowers the center of gravity, which makes the wooden sculpture safer to display.
For the finish, skip the polyurethane. It looks like plastic wrap and it gets sticky on moving parts. Trust your hands on this one. Rub in a thin coat of boiled linseed oil or a natural wax. It will bring out the warm, light beige color of the wood without hiding the CNC or hand-crafted edges. It preserves the texture, which catches the light beautifully when the legs are animated.
## Cutting the Pieces in the Wrong Order
Wait, was that the legs or the body first? Here’s a tip: always cut the largest body pieces first. The reason is not obvious until you realize that small offcuts from the body can be used for those tiny connection rods. If you cut the tiny pins first, you are wasting perfectly good wood. Plus, the larger body parts give you a proper surface to hold onto while you shape the smaller connecting joints.
## Forgetting It Is a DIY Sculpture, Not a Production Run
You are building a father’s day gift, not a batch of factory inventory. The beauty of a handmade wooden art piece is that it shows the maker’s hand. If your drill hole is 0.5mm off, nobody will ever know unless you tell them. If a leg swings a little stiffer than the rest, oil it, play with it. That imperfection is what separates a handmade gift from a machine-stamped product.
If you want to keep the design simple and avoid the stress, many websites sell drop-in plans that you use to make a wooden horse with printable templates. But look, the project in the image uses a light wood with visible joints, and the real charm is in those mechanical parts. It is a mechanical horse that actually moves.
When you step back and turn the crank for the first time, the payoff is unreal. It is not just a sculpture. It is a kinetic sculpture that you built to last, a solid piece of **handmadegift** history. And that beats a store-bought tie or a drill bit set any day. So, would you build one? I think you should. Father’s Day is the perfect excuse to spend an afternoon in the shop.
Leave a Comment