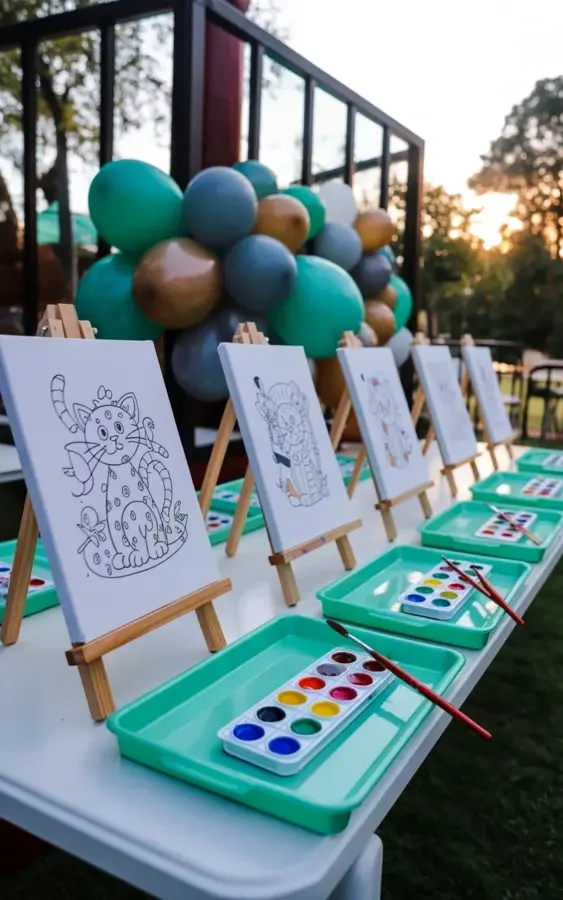
As a woodworking project, these mini easels were honestly an afterthought that turned into the highlight of our backyard cat painting party. I had leftover plywood scraps from building some shelves, and a sudden idea hit me: what if each kid got their own tiny easel with a watercolor station? The photo shows exactly how it turned out: a row of wooden easels on a white table, each holding a canvas with whimsical black and white cat drawings, and a mint green tray loaded with paints. And yes, that’s a giant balloon floating in the background because apparently no party is complete without one. Look, I’m not a professional woodworker. I’m a parent who owns a saw and wasn’t afraid to make mistakes. Here’s what actually worked.
Why I Built Tiny Easels for a Backyard Cat Painting Party
My daughter wanted a cat-themed art party. Every kid draws cats. But handing them a flat sheet of paper on a picnic table? Boring. I wanted something that felt special, something that made them feel like real artists. The idea of a watercolor station outdoors had been bouncing around my head since I saw a similar setup at a craft fair. That one cost fifty bucks per easel. No thanks.
So I decided to build my own. The scrap wood pile had some half-inch plywood and a few 1×2 furring strips. Not gonna lie, the first prototype was a disaster. Too tall, too tippy. I made it smaller. Much smaller. Like, the canvas is maybe six inches tall. That’s the sweet spot for little hands.
And honestly, the cat drawings on the canvases before painting? That was the real hook. I sketched simple cartoon cats on each canvas with a black marker. Different poses: one stretching, one chasing a ball of yarn, one wearing a tiny crown. The kids went nuts. It gave their painting a starting point instead of a blank white void.
Gathering Materials from Scrap Wood and the Hardware Store
You don’t need much. Here’s the short list of what I used:
- Scrap half-inch plywood for the easel body (about 6 inches tall, 4 inches wide)
- A small 1×2 furring strip for the back support leg
- Wood glue and a handful of 1-inch brad nails (or screws if you’re fancy)
- Mint green plastic trays from the dollar store (three for a buck)
- Small watercolor palettes (the cheap ones with dried pans)
- Paintbrushes with short handles (kids knock over long ones)
That’s it. No exotic tools. I used a jigsaw for the curved top of each easel, but a handsaw would work fine. The whole project took maybe two hours for six easels. Oh, and a tip: pre-drill your holes if you use screws. I didn’t on the first one and split the wood. Annoying. Had to start over.
The Simple Saw Cuts That Made It All Work
Here’s the thing: you don’t need complex joinery. Each easel is basically a flat back piece with a small ledge at the bottom to hold the canvas. I cut the plywood into rectangles about six by four inches. Then I cut a smaller rectangle for the ledge, maybe one inch by four inches, and glued it to the bottom front.
For the back support leg, I cut a piece of furring strip about eight inches long, and attached it with a single screw at the top so it can pivot. That’s the trick: the leg angles out the back, and the whole thing stands up. I added a tiny rubber foot (a cut-up pencil eraser) to stop it from sliding on the white table. Not necessary, but nice.
One weird thing I learned: the angle of the back leg matters a lot. Too steep and the easel falls forward. Too shallow and it tips backwards. I tested it by setting it up outside and letting the wind hit it. The balloon in the background photo? It drifted over and bumped into one easel. The easel didn’t even wobble. Satisfying.
Adding the Mint Green Trays and Watercolor Setup
The mint green trays in the photo are from a dollar store snack set. They have three compartments: one for water, one for the paint palette, one for brushes. I hot-glued a small piece of velcro to the back of each tray and a matching piece to the easel’s base. That way the tray stays put when kids grab for it. Because they grab.
I filled each tray with about half an inch of water. Not enough to spill easily, but enough to dip a brush. The watercolor palettes had blue, red, yellow, and green. That’s it. Primary colors plus green. Kids mixed their own oranges and purples. Works way better than giving them twelve weird shades they’ll never use.
The brushes were those cheap plastic-handled ones from a bulk pack. I shortened them by about an inch with a pair of wire cutters. (Don’t tell the brush police.) That made them easier for small fingers to control. Also, the short handles meant they couldn’t accidentally jab each other in the eye. Practical parenting right there.
How the Kids Actually Used These Easels (Practical Tips)
Ok, here’s the real story. Six kids, ages four to eight, outside on a warm afternoon. The easels were lined up on the white table, each with its own cat canvas and mint green tray. I thought they’d be painting for maybe twenty minutes. They stayed for over an hour. No lie.
What worked? Having a clear painting station for each kid. No sharing paint trays. No fighting over brushes. Each kid owned their little easel space. That mattered. Also, the cat drawings gave them a structure. Some kids painted inside the lines. Others went full abstract and painted the cat purple with orange stripes. Both approaches were fine.
What didn’t work? The water cups. I used the tray compartments, but refilling them was a pain. Next time I’m using a squirt bottle. And the sun. We started at 2 PM and the direct sun dried the paint too fast. Moved the table under a tree umbrella. Problem solved. Also, one kid dropped her brush into the grass and it took three minutes to find. Keep a backup brush bin.
The Before and After: What I Learned
The before: a pile of scrap wood and a vague idea. The after: six happy kids, six cat paintings, and a table that looked like a mini art gallery. The photo captures that moment perfectly: the easels standing proud, the mint green trays bright in the sun, that balloon looming in the background like a sentinel. Not gonna lie, I felt a little proud.
But here’s the honest takeaway: these easels are not fine furniture. They’re functional. They wobble a bit if you bump them too hard. The paint trays leave a faint green dye mark on the wood if you don’t dry them fast enough. And that’s fine. This was a kids art activity, not a museum piece. The goal was outdoor painting that held attention, and it did.
If you’re thinking about making your own watercolor station, just start with scrap wood. Don’t overthink dimensions. The key is to get the back leg angle right and the tray secure. Everything else is optional. I’m already planning a second set for a garden flower painting session. Maybe I’ll use pink trays next time. Who knows.
If you try this project, I’d love to hear how it goes. Grab your saw, dig through your scrap pile, and make something that lets kids create outside. That’s the whole point. No fancy tools, no stress, just a few cuts and a lot of paint.
#woodworking #diyeasel #kidsartactivity #outdoorpainting #watercolorstation
Leave a Comment